ARAMEX DASHBOARD GUIDE
Contents
A1: DASHBOARD LOGIN
·
ARAMEX DASHBOARD LINK/URL.: http://dlcportal.aramex.com/aramexportal/Default.aspx
·
Please follow the above link to login Aramex
dashboard which is also known as the Aramex internal operations
portal.
·
Use the username and password provided by the
IT-Department to login
to the portal.
·
In case you do not have an
username and password, please kindly request your manager or team leader to
mail the logistics IT department on the following email address with your full
name requesting an username and password for the dashboard. The logistics IT
email address is.: ALL_DXB_IT_Logistics@aramex.com.
B1: HOMEPAGE WALKTHROUGH
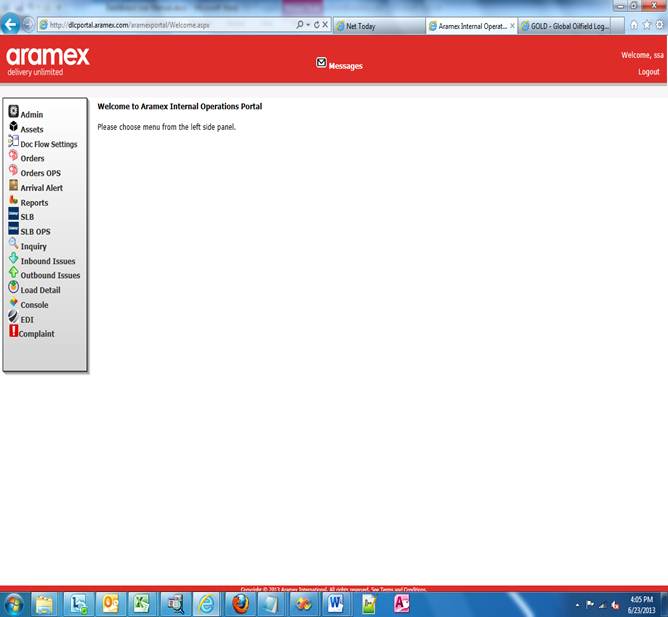
·
The above image is the Aramex
Dashboard HomePage.
·
As shown in the above image the homepage contains a a welcome message for the user
as well as the logout option below it.
·
In the left is a menu with a number of options or sub pages for different operations for the users. For example:
By clicking on the orders option in the menu, the user will be taken to the
orders page where all the information regarding the order or orders is provided/displayed.
·
The number of options/sub-menus available on the left
hand panel differs from users to users and teams to teams
·
If the user/team requires access to a particular item, option,
sub-menu/sub-page or reports, to mail the IT Department requesting for access
to the particular option as well as copying ones manager/team leader in the
mail.
·
The IT department
on confirmation from the user’s manager/team leader will allow access for the
option/sub-menu to the user.
1) Orders
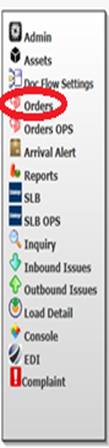
·
The above image
shows the location of the orders page on the dashboard panel. To get any detail
about a particular order(s) click on the orders menu.
·
On clicking on
the orders menu it will take you to a new page as shown in the image below.
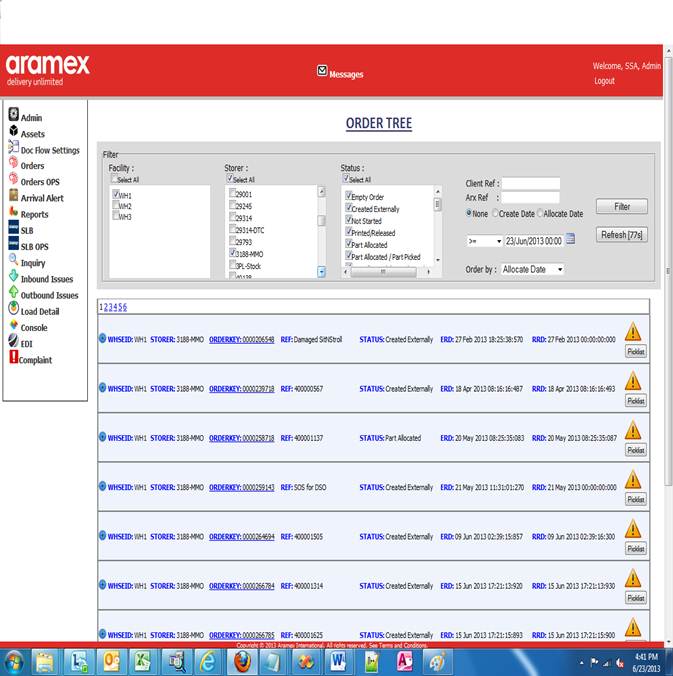
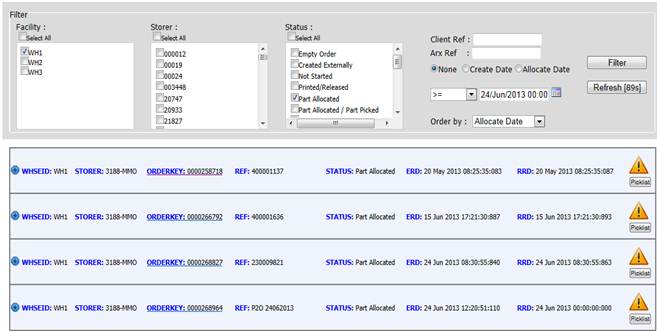
·
As in the above image the user has a number of options to
shorten or widen his/her result
·
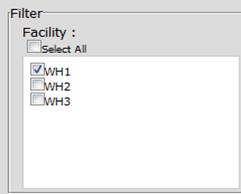
The user can choose to search orders from any or all of
our three facilities/warehouses by just checking any one or all three
checkboxes as in the image below an clicking on
filter.
·
User can also search an order for a particular storer or storer’s by just
checking the checkboxes as in the image below and click filter.

·
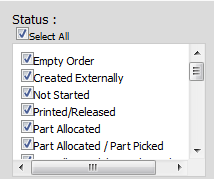
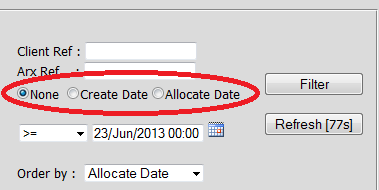
The user can also check by order status as in in the
image below.
·
In the above image we have selected orders having all
statuses i.e. created externally, part allocated, part picked, etc. Such a criteria will show orders having all the statuses
present in the system. The user should just check the Select All check box to
select all the statuses available and click filter.
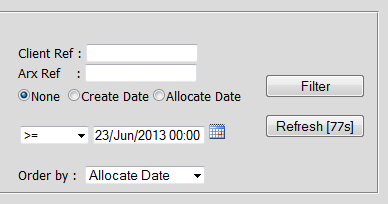
·
The above image shows the last set of search criteria
available to the user.
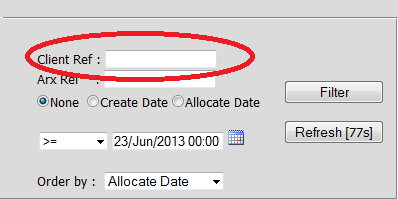
a) Using the Client Ref also known to us as
the Extern OrderKey; This
option
is for searching using the client ref or the external order key
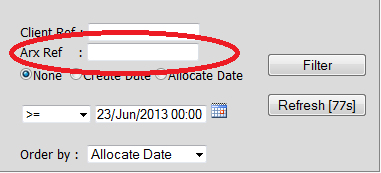
b) Using Arx Ref or OrderKey : This search criteria is using the
Aramex Reference (Arx Ref) or the OrderKey
c) Using the date: This search criteria is for using
the date values for the order like the create date, allocate date or none.
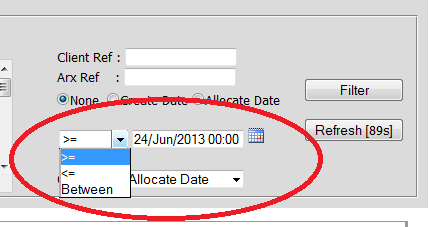
d) Using the mathematical operations: This option give the user the
option to search for an order using mathematical operations like >=:Greater Than Equal To,<=:Less
Than Equal To or Between: Between. These operations can be performed on dates.
For eg.:
To search for an order which has been punched into the system after 24/Jun/2013
just use the greater than operator and select the date from the adjacent box. U
can also use the other two operators in same way.
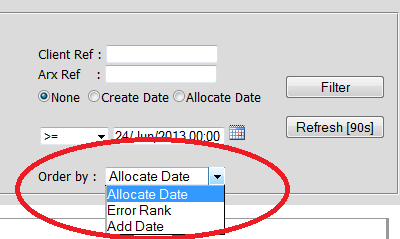
e) Using OrderBy: The orders can also be searched
using the order by option and its different sub-menus or sub-options like
allocate date, error rank, and order date as shown in the image below.The default is always the allocate date.
·
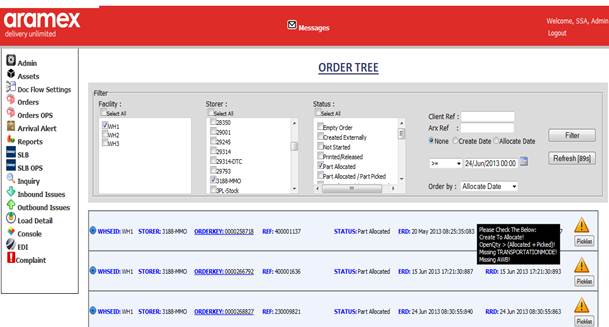
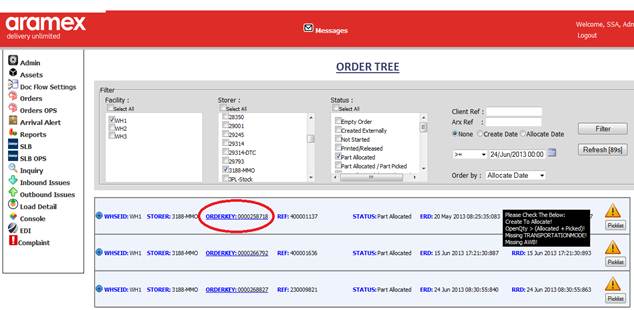
The following image is an
complete example how to use the various search options/search criteria.
·
In the above image we have used the search criteria as follows.:
a) Facility=WH1
b) Storer=3188-mmo
c) Status=Part Allocated
d) Client Ref=Blank
e) Arx Ref=Blank
f) Date=None
g) Date Operator= >= 24/Jun/2013
h) Order By=Allocated Date (This is
the default order by option)
·
As in the above image the result is three orders part allocated for Storer 3188-MMO after or on 24/Jun/2013
·
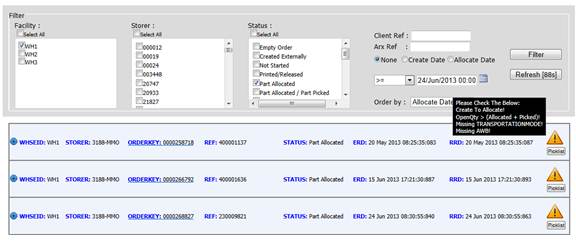
The user can get more information about a particular
order just by clicking on the order key or the circle with the plus near the as
shown in the below images :
·
The user can just hover the
mouse above the icon over the pickdetail button to check any notifications as
in the image below.
·
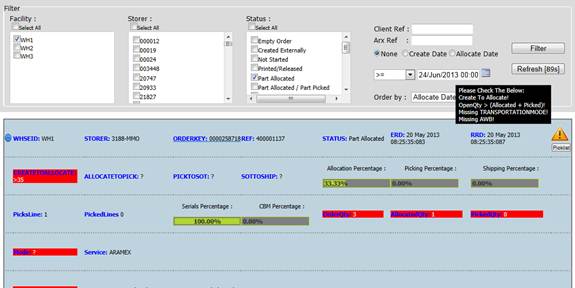
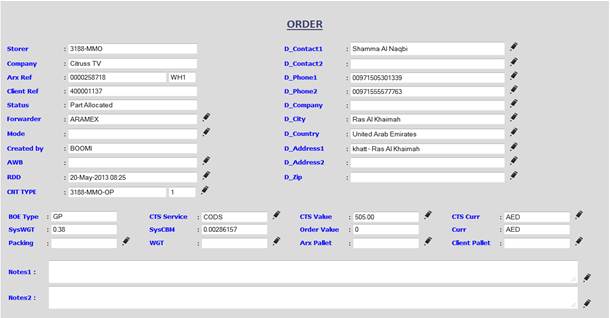
After clicking the order key the user is taken to a new
page containing more information about the particular order as shown below:
·
The new web (image above) gives the user details about
the particular order like:
(1) Storer
(2) Company Name
(3) Arx Ref (Order Key) and the
facility the order is located
(4) Client Ref (Extern Order Key)
(5) Status, etc
as well as other details like consignee details, weight, cbm, order value, etc.
·
There is space provided to the user for making notes
·
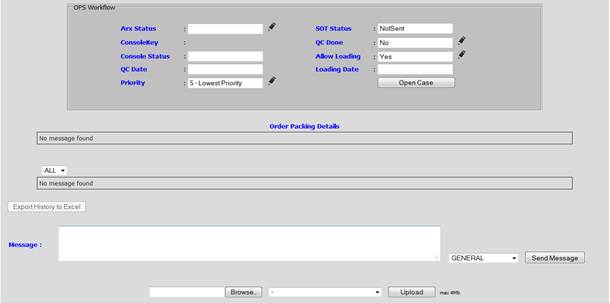
There is also a section for providing details for the operational
details as in the image below:
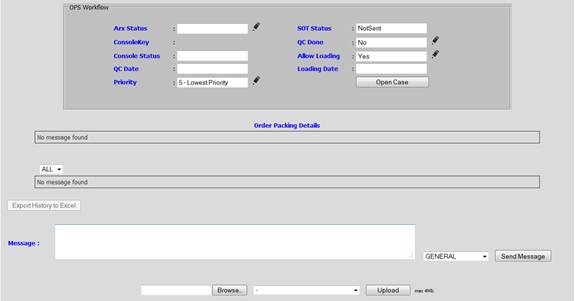
·
The above section provides details in regards to our i.e.
Aramex operations like the Arx status, Priority, QC date, QC status, Loading
permission, Loading date, Console key and console status, etc.
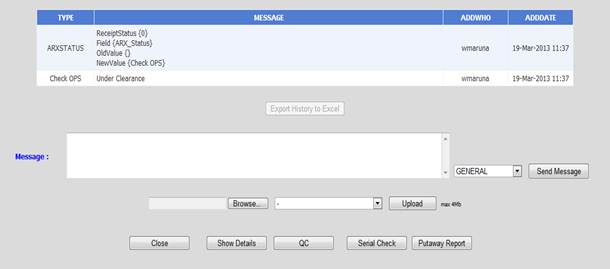
·
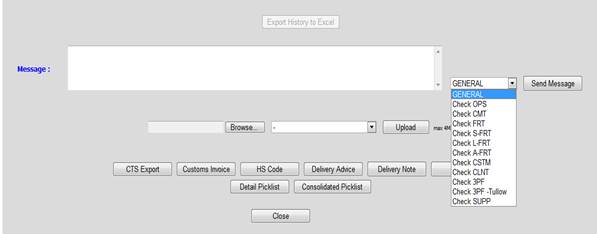
The above section also enables the user to write a
message to various teams just by typing the message, selecting the team to send
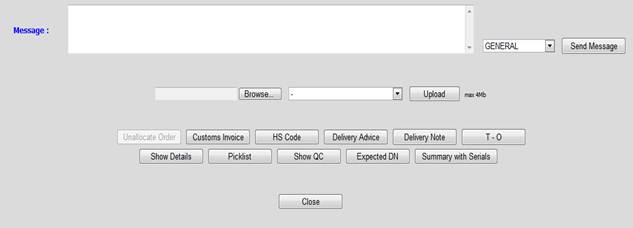
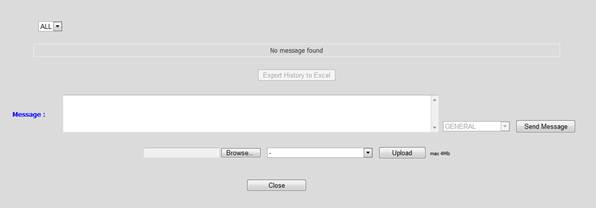
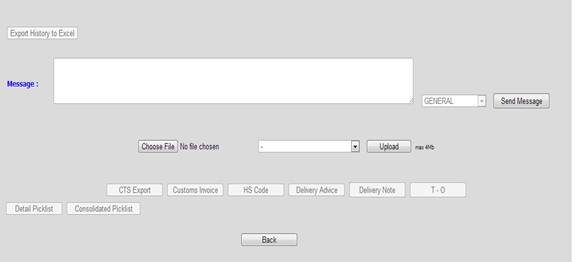
it to and clicking on send as shown in the image below.
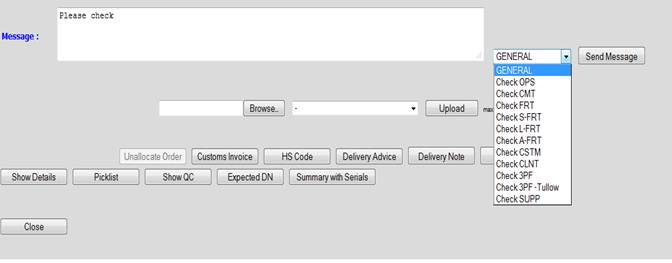
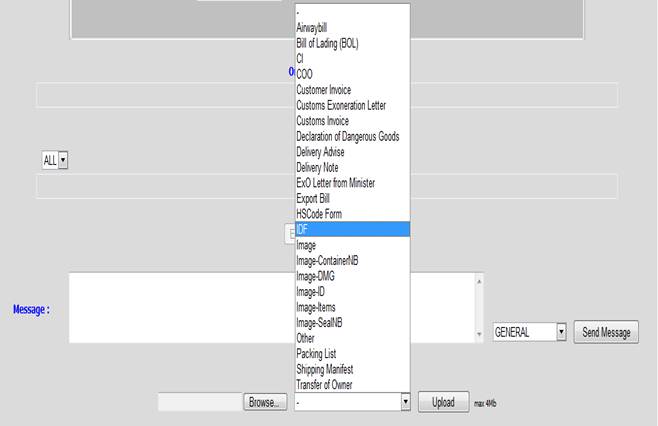
·
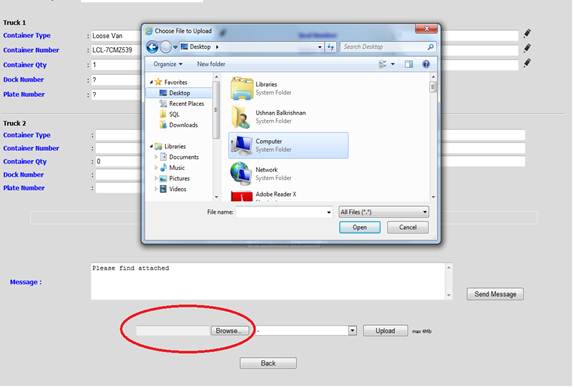
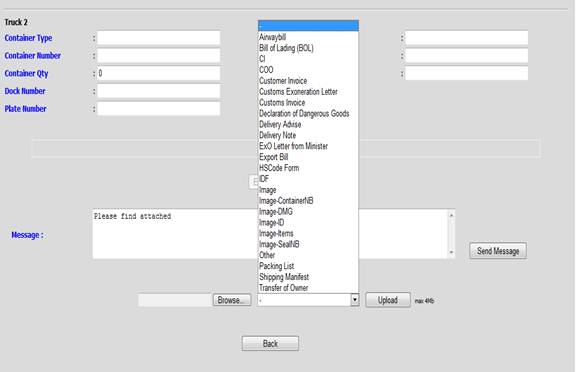
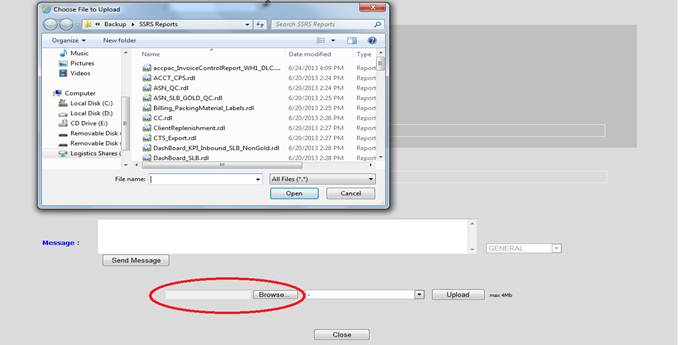
The user can also attach files in the message and send it
to the teams. The user can click on the browse button and select the file and
then file type from the adjacent menu like. The files can be airway bill, bill
of lading, customs invoice, container image, damage image of the items or
container, etc. as shown in the image below.
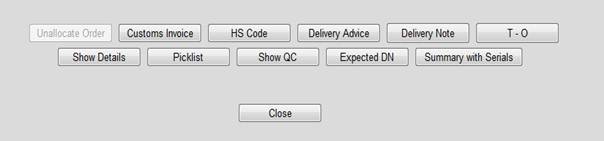
·
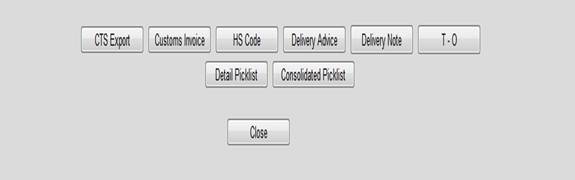
The bottom part of the webpage consists of a number of
buttons as shown in the image below which when clicked give the user a variety
of details depending on the button clicked. Example: Clicking on the customs
invoice displays the customs invoice, the delivery note will provide the
delivery note, picklist will generate the picklist, etc.
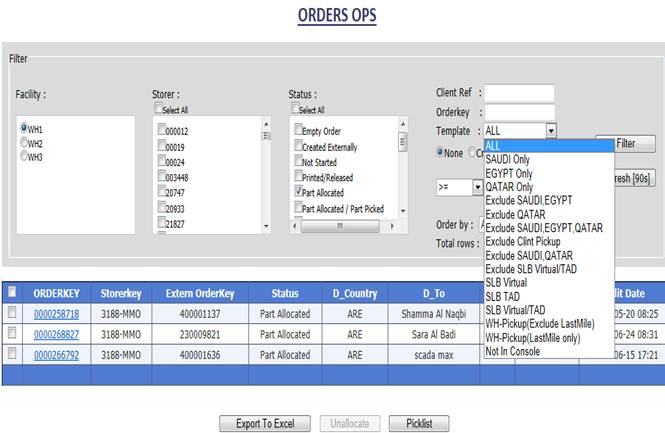
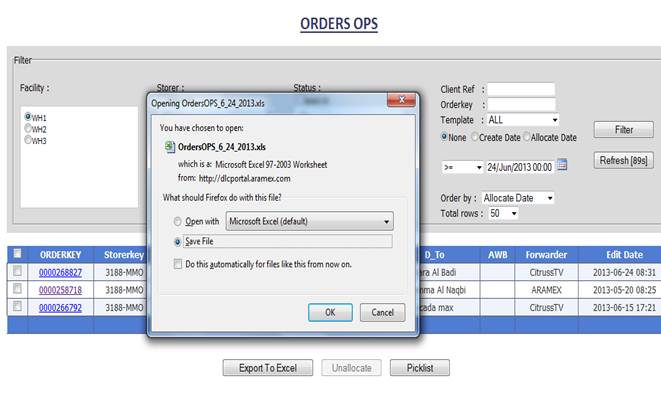
2) Orders Ops
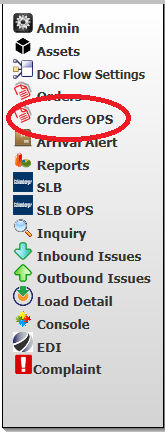
·
The above image
shows the location of the orders ops page on the dashboard panel. To get any
detail about a particular order(s) click on the orders menu.
·
On clicking on
the orders menu it will take you to a new page as shown in the image below.
·
As in the above image the order ops page is almost
similar to the orders page with a few differences like the order template
option, the search result showing the order key, storer
key, D_country, D-To, etc the
option to export the result to excel and the
to print the picklist as in the images below:
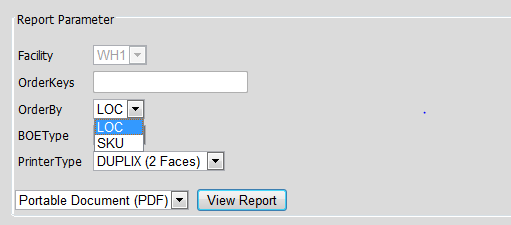
·
When the user clicks on the picklist button on the page
he/she is taken to a new page which is similar to the above image where he can
type in the order key and choose a number of the different options to generate a pick list as shown
below:
a) Order By
LOC or SKU: Choosing this option will generate the picklist ordered using the
LOC or SKU. The default is LOC.
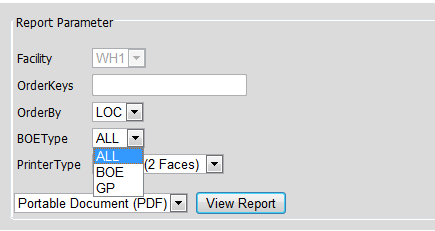
b) BOEType: Choosing this option will
generate the picklist by the BOE
type. The BOE types available in the option are :(1)
ALL (2) BOE and (3) GP (Gate Pass).The default option is ALL.
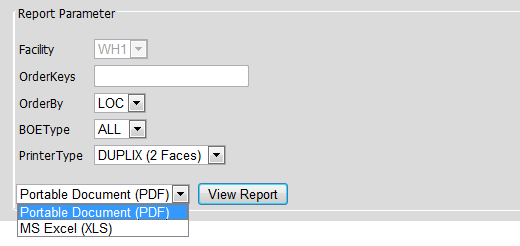
c) Printer Type: This option enables
the user to use two different printing options for the picklist as in the image
below. The default is duplex.

d) View Report: The user is also
given the option of viewing the picklist in two different formats pdf and excels respectively as shown in the image below. The
default is PDF.
3) Assets
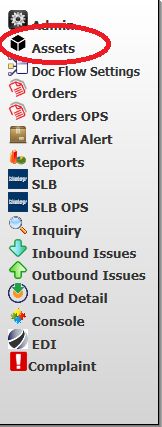

·
The above images show the location of the assets page as
well as its general layout.
·
The assets page is mainly accessible only to the managers
/ supervisors/team leaders , etc.
·
The assets page provides all the information regarding
the assets ( aramex property) used by the teams
·
The assets page is useful mainly by the
managers/supervisors/team leaders so as to monitor the usage of the assets
provided to them and their teams and ensure smooth functioning and to avoid
misuse.
·
The main assets currently in use are the RF Scanners user
by the operations.
·
The data displayed on the assets page is different to the
different teams as they will have access only to the assets provided to them
and not to the others.
·
The below image gives the available options to search the
assets in a different ways.
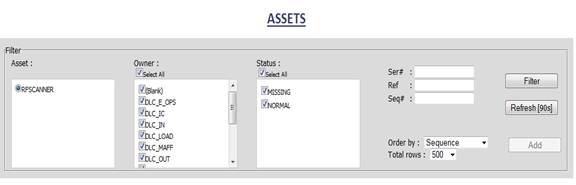
·
As in the image the various search options are
(a) Asset (Currently only RF)
(b) Owner (Options displayed differ
from team to team)
(c) Status (Missing or Normal): This
option lets the user filter the search for scanners having missing or normal
status.
(d) Ser# : Searches the RF using the
serial no
(e) Ref : Searches by the reference
number
(f) Seq# : Searches the RF using the Aramex
sequence number written on the scanner. The sequence number is like
01,02,10,11,15,52,56, etc.
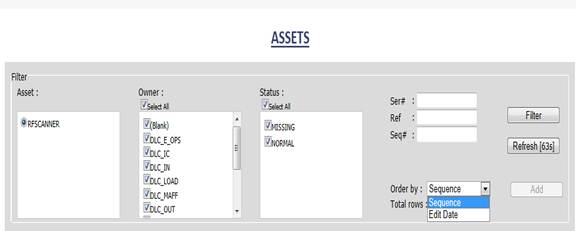
(g) OrderBy:
This option
allows the user to order the result by the sequence no or edit
date as in the above image.
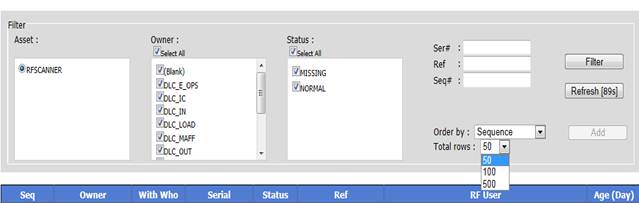
(h) Total Rows: The above image allows
the user to decide on the total number of rows of result to be displayed. The
user can use 50,100,500.
·
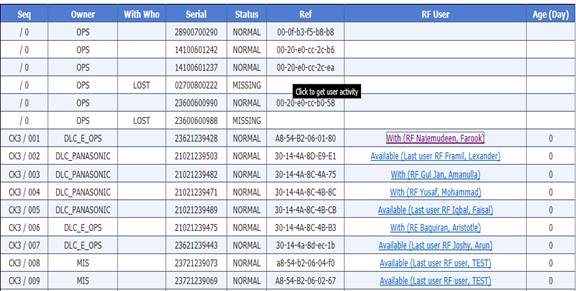
The below image shows the result of an asset search
·
As in the above image the result is shown which includes
the sequence number (Seq),Owner,
With Whom (indicating the current status of the scanner),Serial, Status, Ref,
the user currently logged in or the last user logged who had logged in and the
age of the login i.e. if the user has been logged in it for two days the age
will be shown as two days.
·
Every employee using the RF scanner is advised to log out
from the scanned every day as he leaves office.
·
The mangers/supervisors/team-leaders can also check the user activity by
just clicking on the user name on the RF user column as shown below.
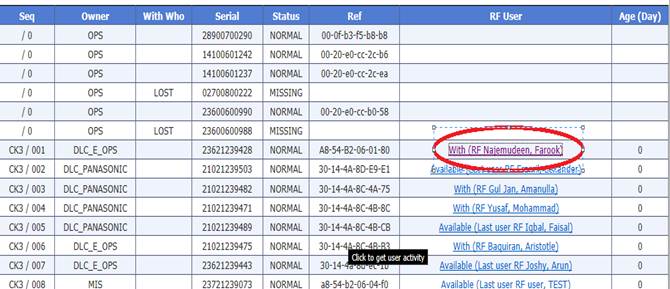
·
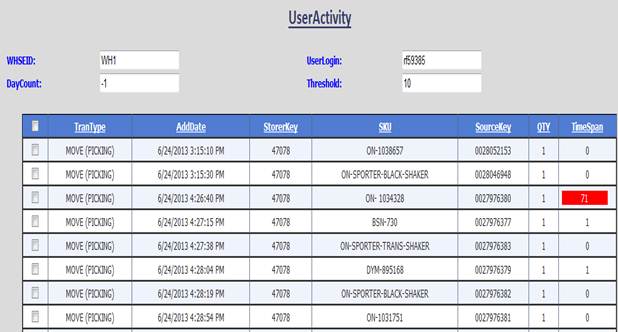
After clicking on the RF user the user will be taken to
a new page where he can view the
activities of the user using the particular RF.
4) Arrival
Alert
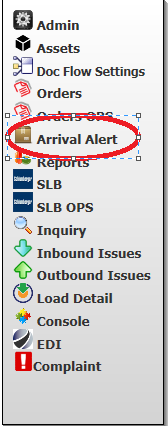
·
The above image shows the location of the arrival alert
page.
·
The arrival alert page is mainly useful for the inbound
operations for getting alerts regarding the arrival of trucks in our facility
with the shipment.
·
The arrival alert enables the operations to search all
the information regarding the history of arrival of shipments in our facility
in regards to the estimated and actual date and time of the truck arrival,
vehicle plate no, container no, container type, driver details, BOE, invoice
no, etc.
·
The below image shows the arrival alert page.
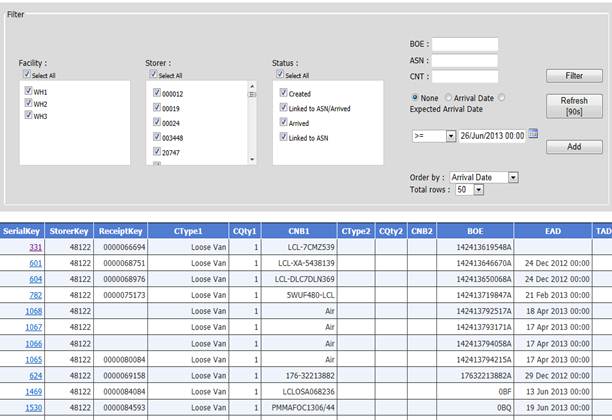
·
As shown in the above image there are a number of search
criteria available for searching the truck arrival alert like:
a) Facility=WH1,WH2,WH3
b) Storer= Any or all of the storers
in our facilities
c) Status=Created, Linked to ASN/Arrived,
Arrived, Linked to ASN
d) BOE=BOE NO
e) ASN=ASN
f) CNT=Container No
g) Date=None, Arrival Date, Expected
Arrival Date
h) Date Operator= >= (Default), <=,=
i) Order By= Expected Arrival Date,
Arrival Date (This is the default order by option)
j) The user also has the option to
view the result in rows of
50,100,500.
·
The user can get more information about a arrival date
just by clicking on the serial key as shown in the below image :
·
After clicking the serial key the user is taken to a new
page containing more information about the particular arrival date as shown in
the images below:
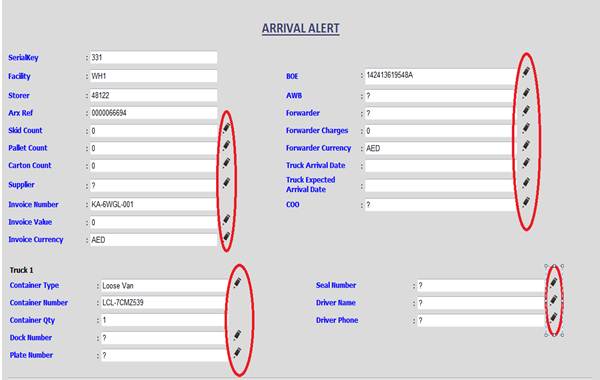
·
As in the above images the Arrival Alert page gives the
user all the details for the arrival date like
the estimated and actual date and time of the truck arrival, vehicle
plate no, container no, container type, driver details, BOE, invoice no, etc.
·
There is also a pencil icon besides a number of the
fields as highlighted in the images which allows the user to edit the information.
·
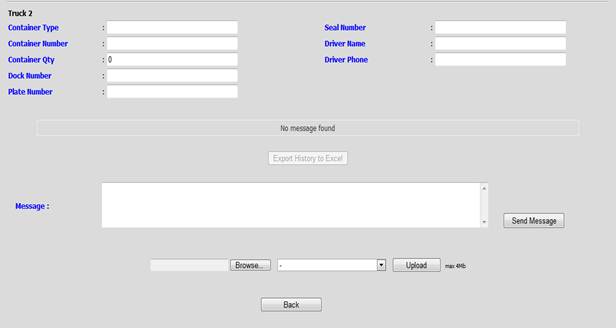
The user can also add the details for another truck under
the same serial key if the shipment has come in two different trucks.
·
The user also has an option to send a message as well as
send a message with an attachment as shown in the images below:
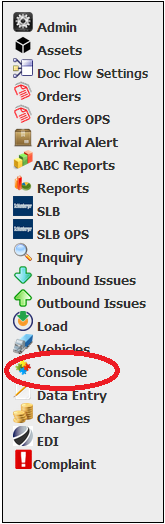
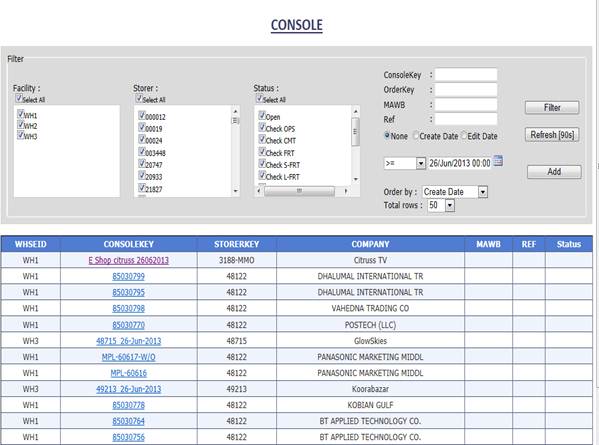
5) Console
·
The above image shows the location of the console pmage.
·
The console page shows information regarding the consolidated
orders.
·
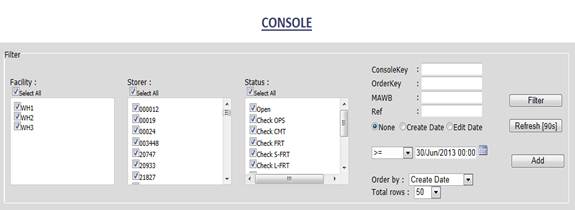
As shown in the above image there are a number of search
criteria available for searching the truck arrival alert like:
a) Facility=WH1,WH2,WH3
b) Storer= Any or all of the storers
in our facilities
c) Status=Check Ops, Check CMT, Check
FRT,Check L-FRT,etc
d) Console Key=ConsoleKey
e) OrderKey= OrderKey
f) MAWB=Master Air Way Bill. (A
console has one master airway bill and many child airway bills
.
g) Ref=Ref
h) Date=None, Create Date, Edit Date
i) Date Operator = >= (Default), <=,=
j) Order By= Edit Date, Create Date
(This is the default order by option)
k) The user also has the option to
view the result in rows of
50,100,500.
·
The below image shows the console page.
·
Note: The consolekey is always created by the CMT.
·
The user can get more information about a console just by
clicking on the console key as shown in the below image :
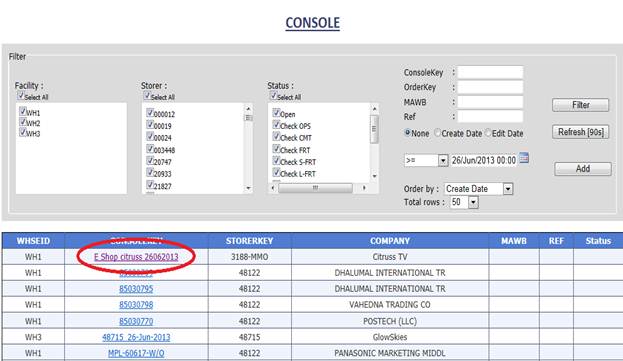
·
After clicking the console key the user is taken to a new
page containing more information about the particular console as shown in the images below:
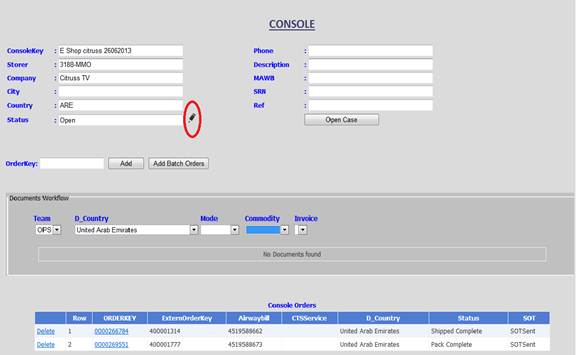
·
There is also a pencil icon besides a number of the
fields as highlighted in the images which allows the user to edit the
information.
·
The user can add orders and batch orders by entering the
order key in the given field an clicking on add for orders or add batch orders
for batch orders as shown in the image below:
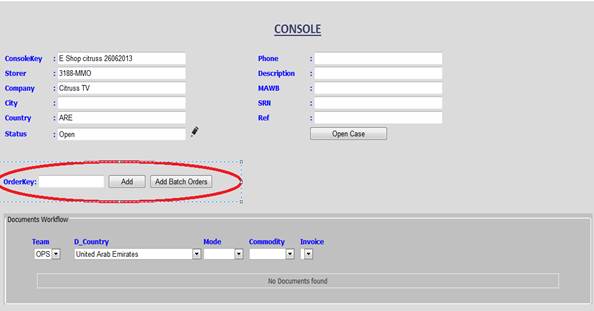
·
There is also an feature for to user to add documents and
other values and details to the orders in the documents workflow part of the
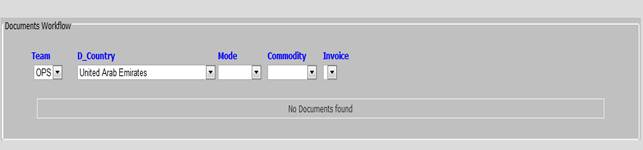
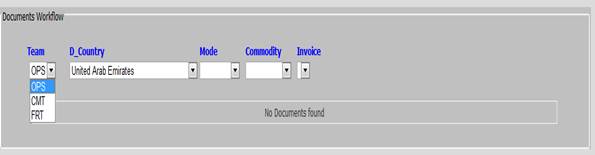
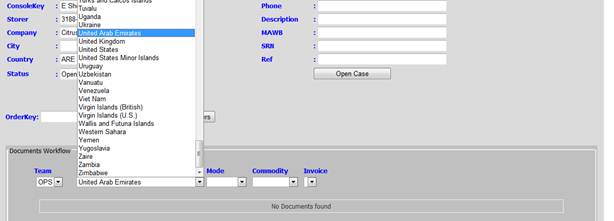
page as in the image below:
·
The details the user can add in the doc flow are as
follows :
a) Team: OPS, CMT, FRT as shown in
the image below.
b) D_Country (Destination Country): All of the
countries in the world to which Aramex Ships as shown in the image below.
c) Mode: The mode to which the
shipment is sent namely land, sea or air as shown in the image below.
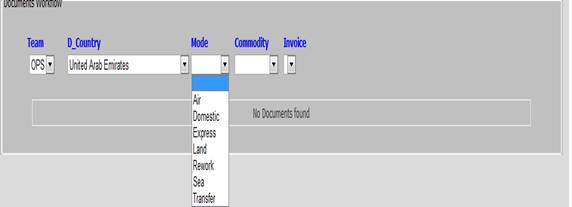
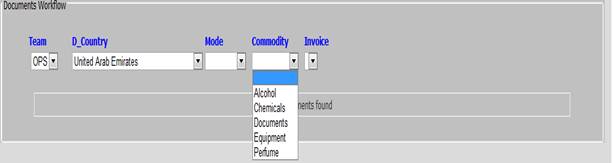
d) Commodity. The type of commodity
the shipment is carrying. The types of commodity are shown in the image below.
e) Invoice: The invoice number of the
shipment.
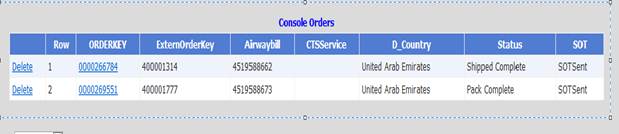
f) The numbers of orders in the
shipment is listed in the console orders section of the page. This section
provides details regarding the no orders in the console, orderkey,
externorderkey, airwaybill, cts service, d_country (destination country),
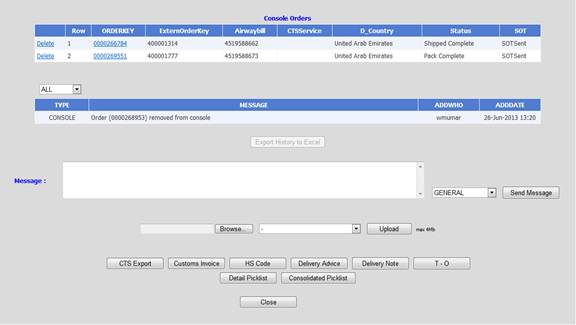
status and sot as shown in the image below.
·
The messages section is used to add notes and send messages to different teams as shown in the images below:
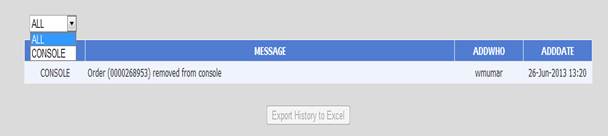
a) The Type of messages can be all or
console as in the image above.
b) The message can be sent to a
particular team or it can be just general as shown in the image above.
c) The user can also attach files in
the message and send it to the teams. The user can click on the browse button
and select the file and then select the file type from the adjacent menu. The
files can be airway bill, bill of lading, customs invoice, container image,
damage image of the items or container, etc. as shown in the image below.


·
The bottom part of the webpage consists of a number of
buttons as shown in the image below which when clicked give the user a variety
of details depending on the button clicked. Example: Clicking on the customs
invoice displays the customs invoice, the delivery note will provide the
delivery note, consolidated picklist will generate the consolidated picklist to
print, etc.
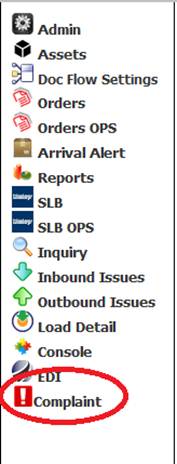
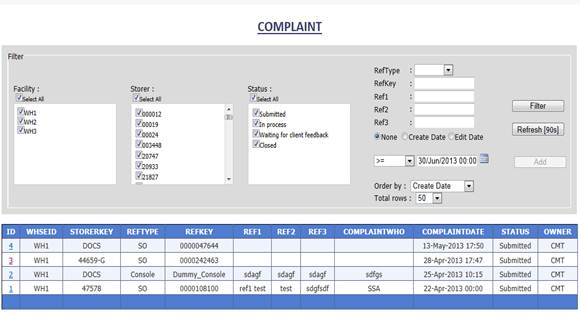
6) Complaint
·
The above image shows the location of the complaint page.
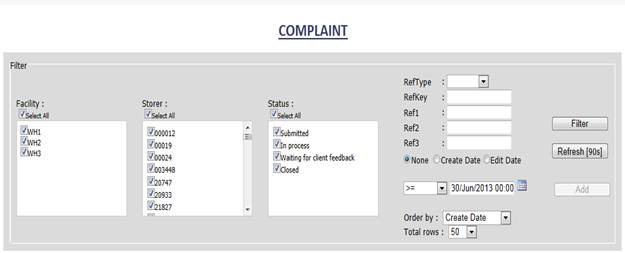
·
The complaint page allows the user to add complaints and
view/search existing complaints
·
As shown in the above image there are a number of
criteria required to add a complaint or search a complaint like:
a) Facility= WH1,WH2,WH3
b) Storer = Any one,two,etc or all of the storers in our facilities
c) Status= Submitted, In Process,
Waiting for client feedback, Closed
d) RefType =Console,ASN,SO
e) RefKey= The reference key of the
reference
f) Ref1,Ref2,Ref3= The reference no’s
g) Date=None, Create Date, Edit Date
h) Date Operator = >= (Default), <=,=
i) Order By= Edit Date, Create Date
(This is the default order by option)
j) The user also has the option to
view the result in rows of 50,100,500.
·
The below image shows the complaint page :
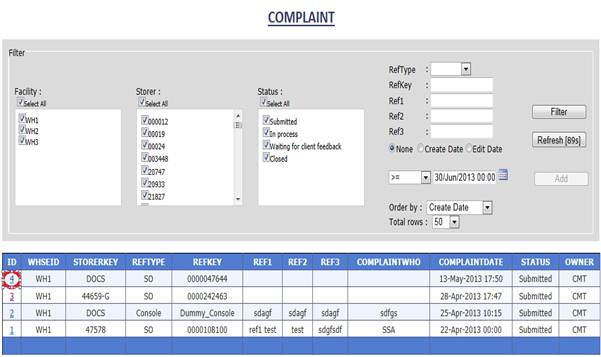
·
The user can get more information about an existing
complaint just by clicking on the id as
shown in the below image :
·
After clicking the id the user is taken to a new page
containing more information about the particular complaint as shown in the
images below:
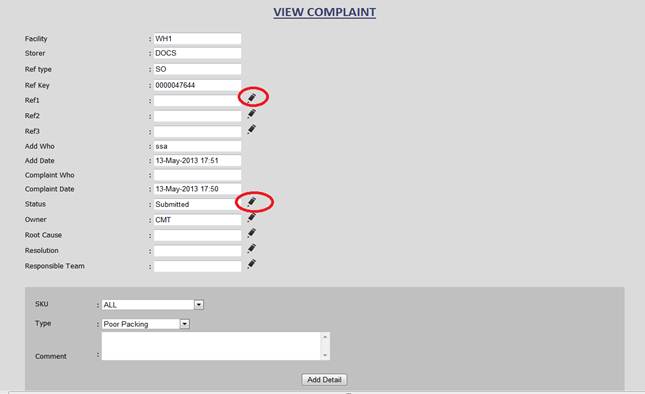
As in the above images the complaint page
gives the user all the details of a particular the complaint like
a) Facility= WH1,WH2,WH3
b) Storer = Any one,two,etc or all of the storers in our facilities
c) RefType = Console,ASN,SO
d) RefKey= The reference key of the
reference
e) Ref1,Ref2,Ref3 = The reference
no’s
f) Complaint Who = The name of the
complainant
g) Complaint Date = The date of the
complaint
h) Status = Submitted, In Process, Waiting for
client feedback, Closed
i) Owner = The owner of the complaint
j) Root Cause = The root cause of the
complaint
k) Resolution = The type/way the
complaint is resolved
l) Responsible Team = The team by whom the complaint was resolved
m) SKU = The sku or sku’s in the
complaint
n) Type = Poor Packing, Wrong Mode,
Wrong Destination, Wrong Documentation, Delay SOT , Cancel after picking.
o) Comment = The comment box where
comments or notes regarding the complaint can be put.
·
There is also a pencil icon besides a number of the
fields as highlighted in the images which allows the user to edit the
information.
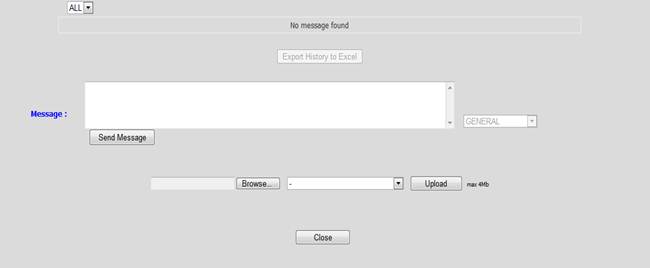
·
The user also has an option to send a message as well as
send a message with an attachment as shown in the images below:

·
The above image shows the number of options available to
the user to specify the type of file sent as an attachment.
7)
SLB
·
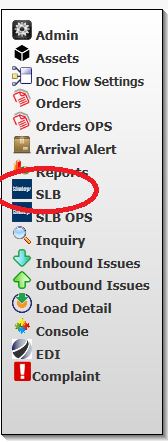
The above image shows the location of the SLB page.
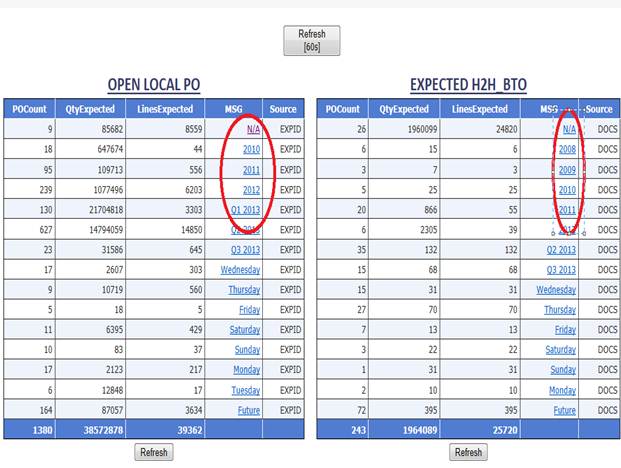
· The SLB page provides all the information regarding the SLB operations
· The SLB page consists of a number of tables which provide information regarding the various parts of the SLB operations.
· The SLB page is shown in the below images :
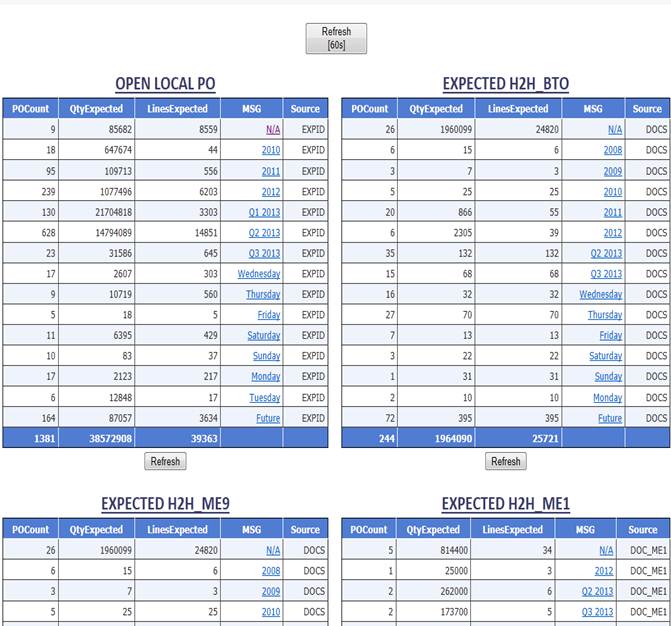
·
As mentioned
above the SLB page is divided into various sections displaying information in
regards to various operations.
·
As shown in the
images below the user can click on the msg column and
obtain additional information.
·
After clicking
on the msg column on can get the additional
information as shown in the image below :
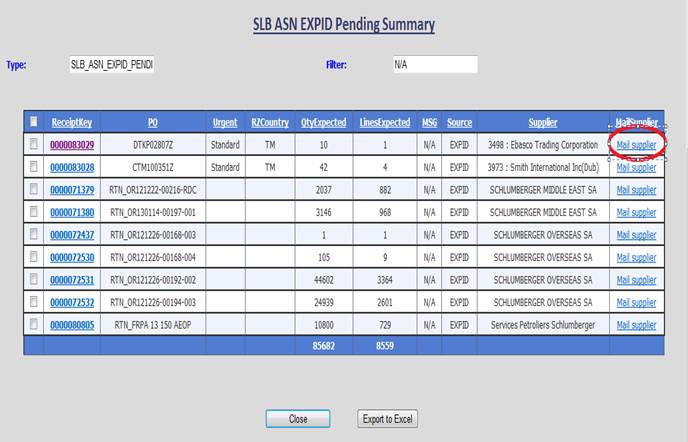
·
The user can
also send an email to the supplier by just clicking on the mail supplier option
as highlighted in the image above.
·
The below images shows Do
Status Summary portion on the SLB page with its different options which are available
to the user.
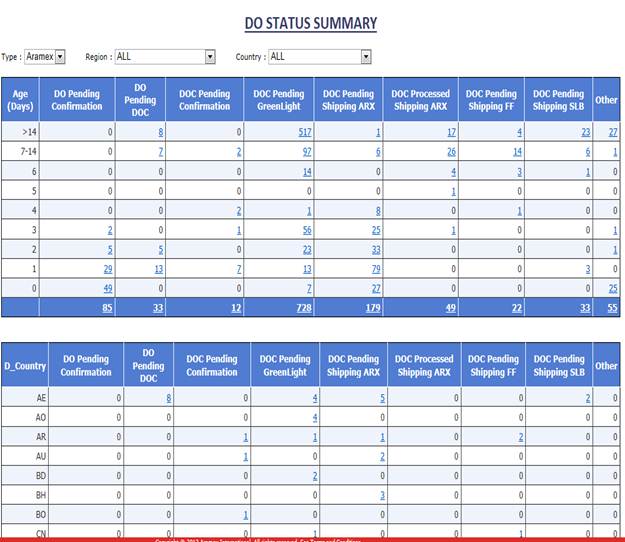
·
The options
available to the user are :
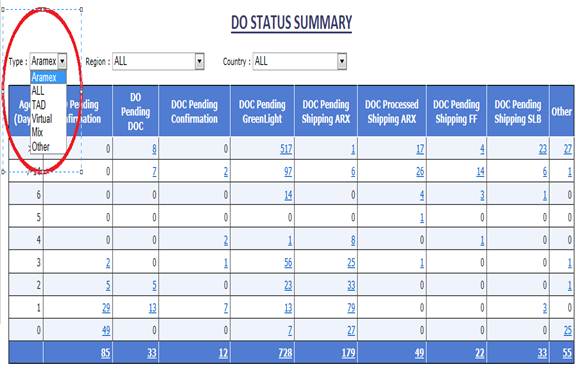
1.
Type: This is
the DO. It has the following list of options Aramex, All, TAD, Virtual, Mix,
Other as in the image below
2.
Region: The
second option available is the region which enables the user to select the
region of the destination country as shown in the image below.
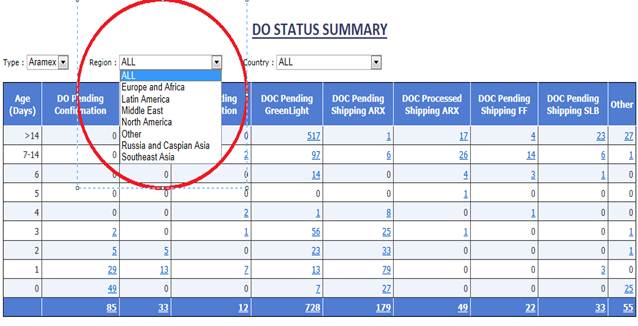
3.
Country: The
third option available is the country with the country code which enables the
user to filter the search using the country of destination as shown in the
image below.

8) SLB
OPS
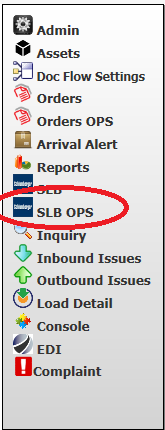
·
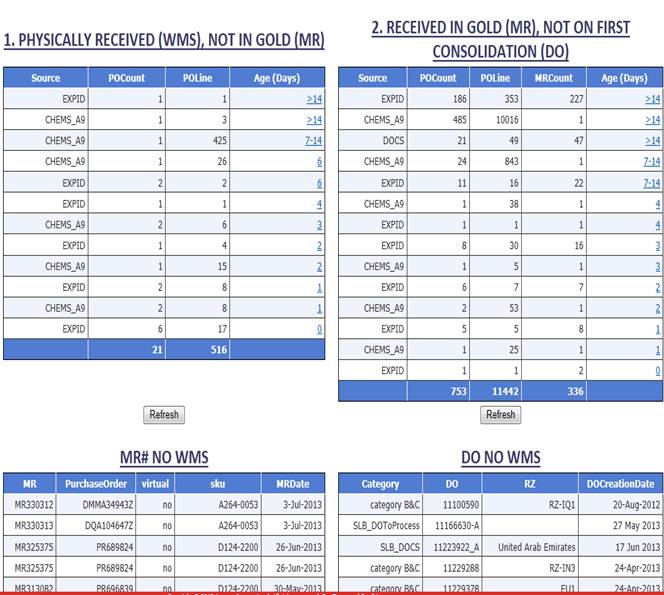
The above image shows the location of the SLB OPS page.
· The SLB OPS page is mainly used by the SLB operations in regards to the different areas of the SLB operations.
· The SLB page consists of three tables tables which provide information regarding the various parts of the SLB operations.
· The complete SLB page is show in the images below.
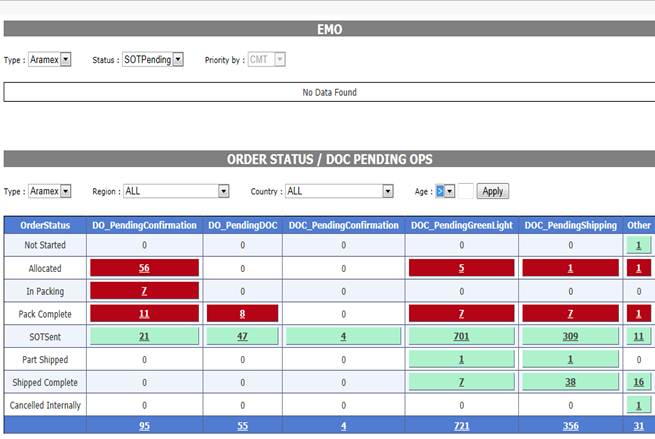
·
As in the above
image the details
highlighted with the red is for the OPS attention and the ones
highlighted with green is for the CMT.
·
The first table
is for the EMO or the Emergency Orders. These orders have a high priority. The
EMO table of the SLB OPS page is shown below.
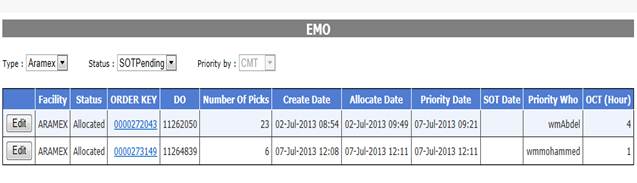
·
The EMO table
has the following available options:
(1) Type: This is the DO. It
has the following list of options Aramex, All, TAD, Virtual, Mix, Other, etc.
(2) Status: This is the status
of the order. It has the following list of options SOT PENDING, SOT SENT and
ALL.
(3) Priority By: This option
displays the team which has set the order priority. In the EMO only the CMT
team can set the order priority hence this option is cannot be changed and is
always CMT.
·
The second
table is the Order Status/DOC Pending Ops. This provides information about the
details of the SO. The Order Status/DOC Pending Ops table of the SLB OPS page
is shown below.
·
The Order
Status/DOC Pending Ops table has the following available options:
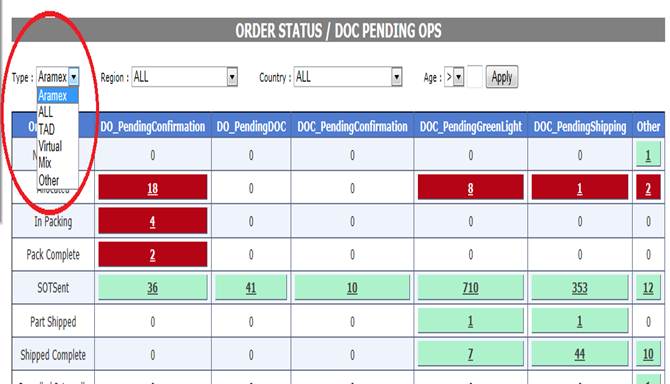
a.
Type: This is
the DO. It has the following list of options Aramex, All, TAD, Virtual, Mix,
Other as shown in the image below.
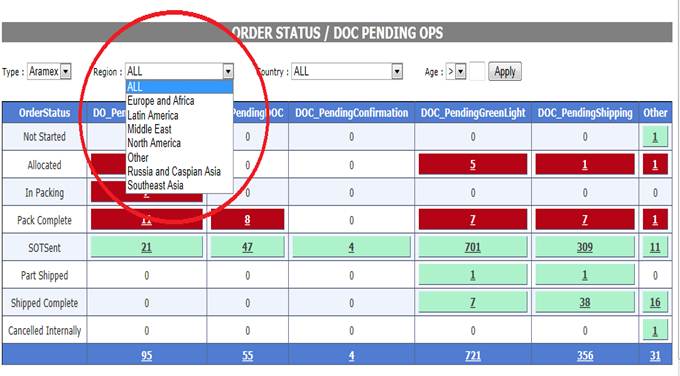
b.
Region: The
second option available is the region which enables the user to select the
region of the destination country as shown in the image below.
c.
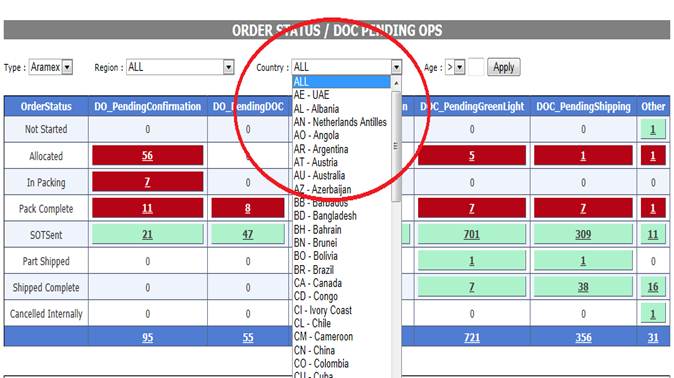
Country: The third
option available is the country with the country code which enables the user to
filter the search using the country of destination as shown in the image below.
d.
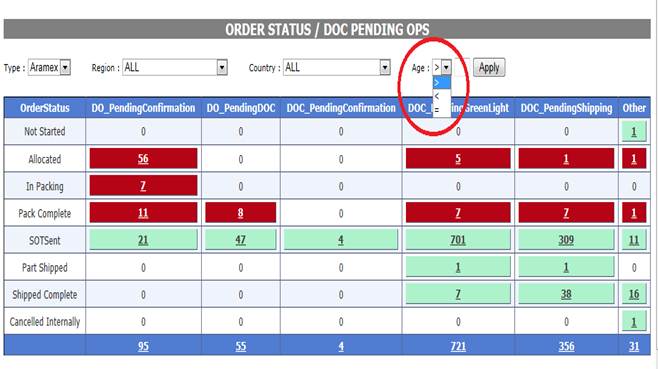
Age: The age
option give the user to search the SO details using the date operator like namely Greater Than
(>), Less Than (<), Equal To (=) as shown in the image below .
·
There is also
an apply button which enables the user to start searching using the criteria
selected.
·
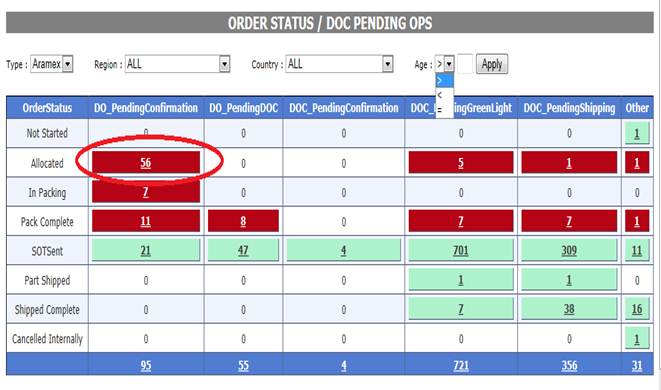
The user can
also obtain more information about the SO by just clicking on the values from
the suitable column. An example is shown below.
.
·
Here by
clicking on the order value of 56 in the DO_PendingConfirmation column by the
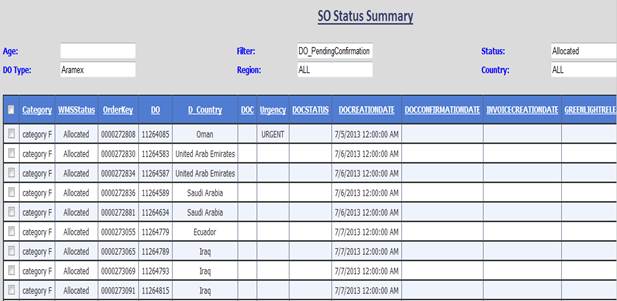
allocated row the user is taken to the SO summary page where he is provided
with further details about the SO as shown in the image below.
·
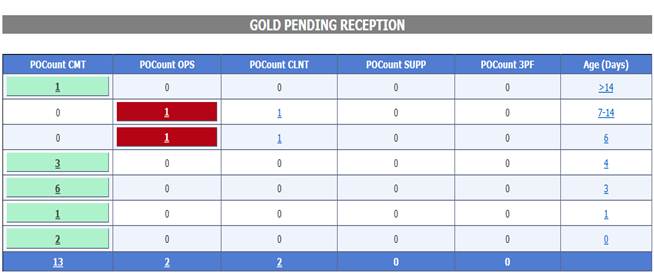
The third and
final table Gold Pending Reception provides details regarding the SLB Gold
account. The Gold
Pending Reception table is shown in the
below image.
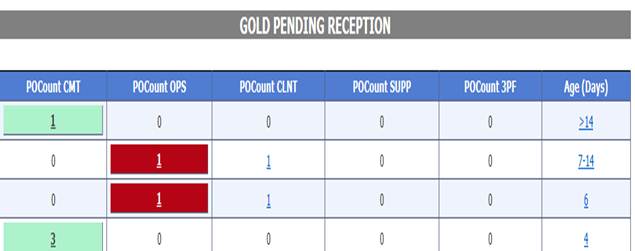
·
The user can
also obtain more information about the SO by just clicking on the values from
the suitable column. An example is shown below.
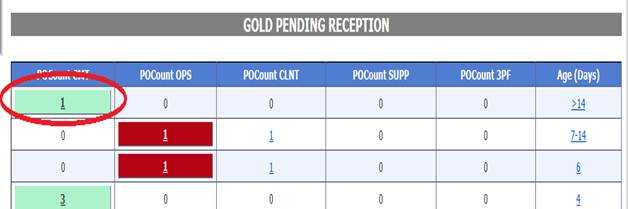
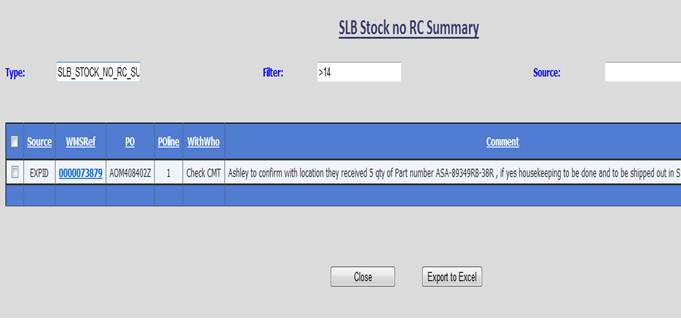
·
In the above
image by clicking on the order value of 1 in the POCountCMT column the user is
taken to the SLB Stock No RC Summary page where he is provided with further
details about the SO as shown in the image below.
9) Inquiry
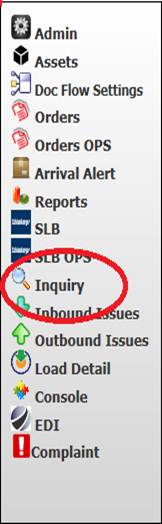
·
The above image
shows the location of the inquiry page on the dashboard panel.
·
The inquiry is
one the most frequent used pages on the dashboard.
·
The inquiry
page can be used to get various information in regards to the SKU, ASN or SO.
·
The inquiry
page is shown in the below images:
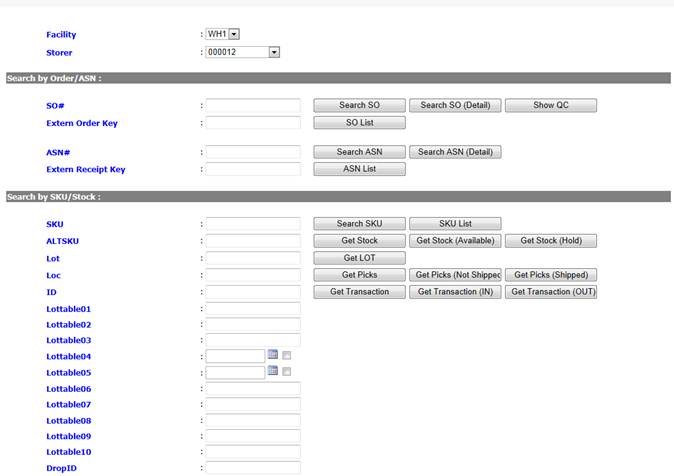
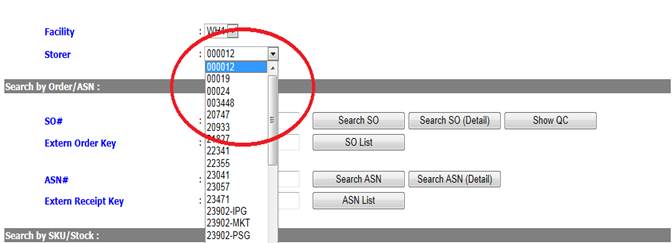
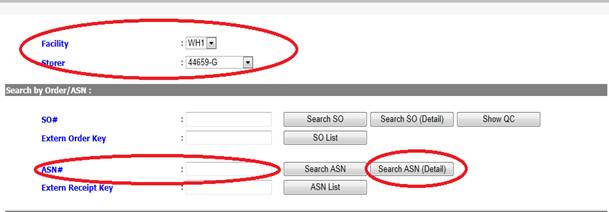
· The two primary search criteria available to the user is searching by the facility and storer as shown in the below images.
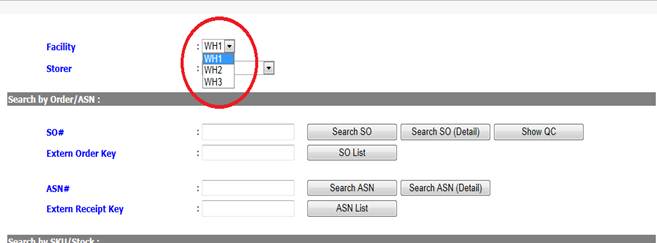
· The facilities available are WH1, WH2, WH3.The facilities available to each user depends on the users requirements.
· Each user is assigned as set of storers as per his or her requirements from which he/she can choose.
· The inquiry page is divided into three parts which are as follows.
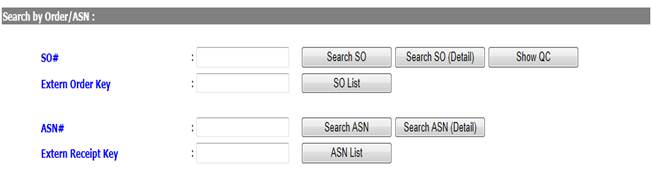
Part 1: Searching ORDER/ASN
·
The first part
is to search order/asn as shown in the
image below:
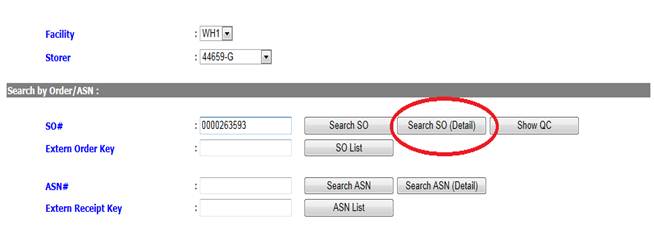
· For searching the details using the so the facility should be selected correctly as below:
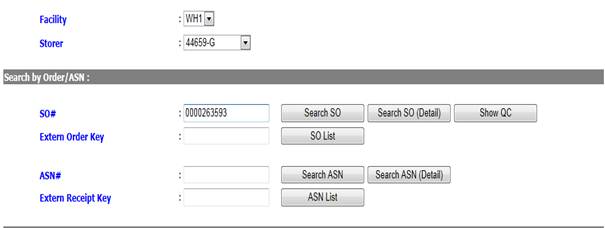
· In the image above we have selected an SO for storer 44659-G in the facility WH1. Please note that if the facility is incorrect the details will not be shown.
· If the user wants to obtain more information about the given SO header he can click the Search SO button after selecting the facility and entering the correct SO in the SO# field as shown in the below image.
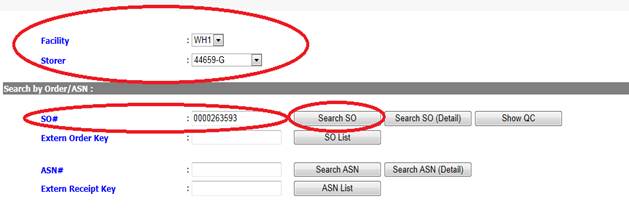
·
On clicking the
Search SO button the user is taken to the order page which displays SO Header
information as shown in the below images:
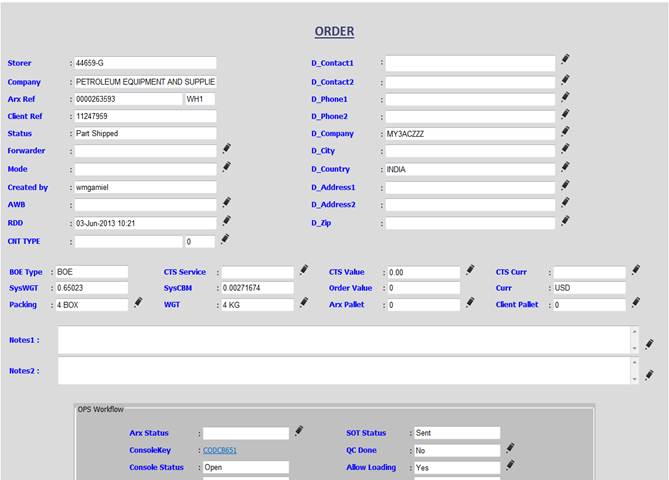
·
The above images show the Order page which displays all
the information available with for the Order.
·
The user can
also get more details about a given SO
by just clicking on the SO detail button as shown below:
·
On clicking the
Search SO (Detail) button the user is taken to the order detail page which
displays detailed information about an SO as shown in the below image:
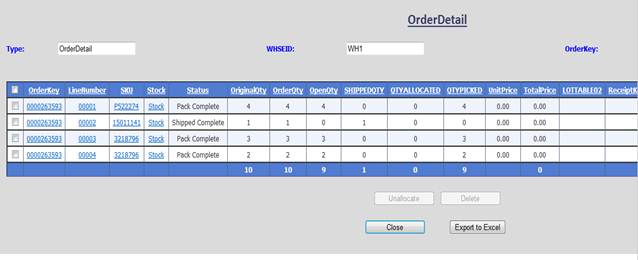
·
As shown in the
above image the order detail displays additional information like the order
key, line number, sku, stock, status, etc.
·
The user can
also get the QC details about a given SO by just clicking on the Show QC button
as shown below:

·
On clicking the
Show QC button the user is taken to the QC detail page which displays detailed information
about the QC of an SO as shown in the below image:
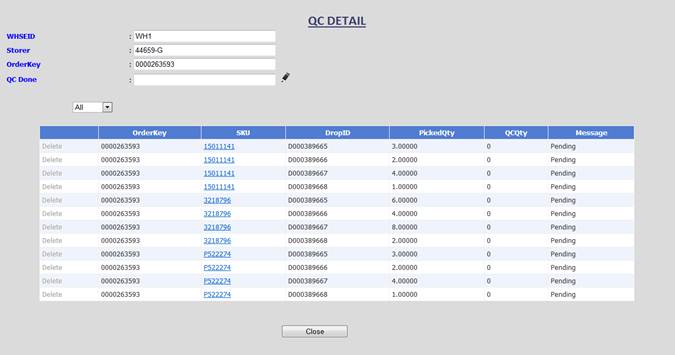
·
As shown in the
above image the QC detail displays the QC information like the order key, sku, dropid, picked quantity, QC
quantity and message.
·
The user can
also get the external order details by typing in the external order key and clicking
on the SO List button as shown below:
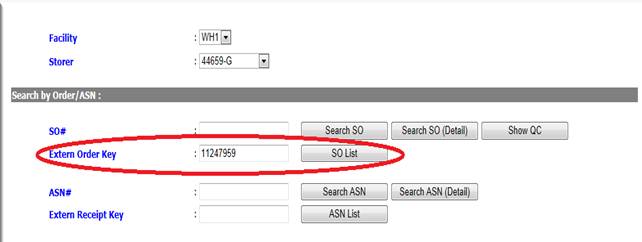
·
On clicking the
SO List button the user is taken to the External Order Detail page which
displays detailed information about the SO as shown in the below image:

·
Searching ASN:
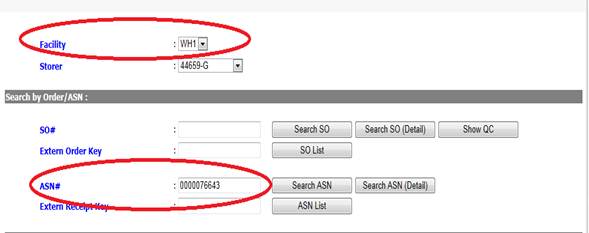
· In the image above we typed in an ASN in the facility WH1. Please note that if the facility is incorrect the details will not be shown.
· If the user wants to obtain more information about a given ASN header he can click the Search ASN button after selecting the facility and entering the correct ASN in the ASN# field as shown in the below image.
·
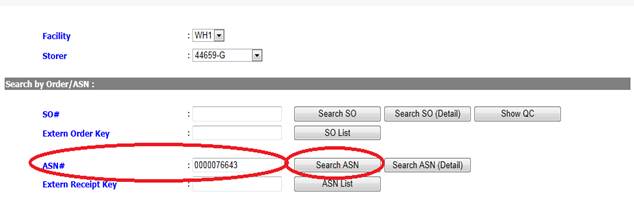
On clicking the
Search ASN button the user is taken to the ASN page which displays ASN Header
information as shown in the below images:
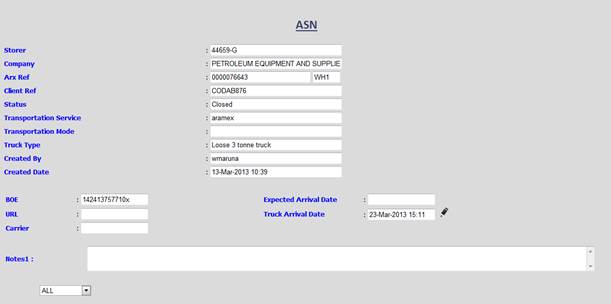
·
The above images show the ASN page which displays all the
information available with for the ASN.
·
The user can
also get the ASN details by typing in the external order key and clicking on
the ASN (Detail) button as shown below:
·
On clicking the
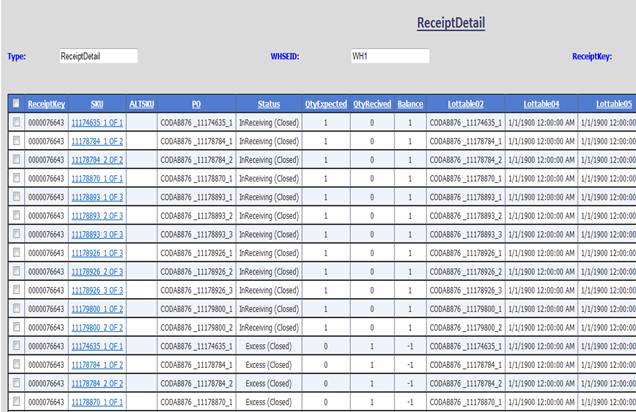
Search ASN (Detail) button the user is taken to the ASN detail page which
displays detailed information about a given ASN as shown in the below image:
·
The user can
also get the external receipt details by typing in the external receipt key and
clicking on the ASN List button as shown below:
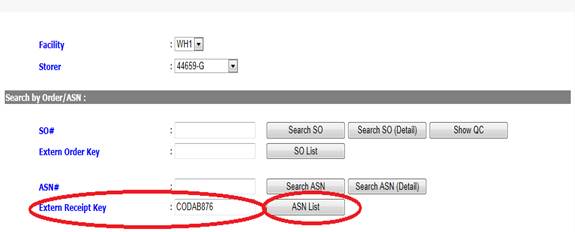
·
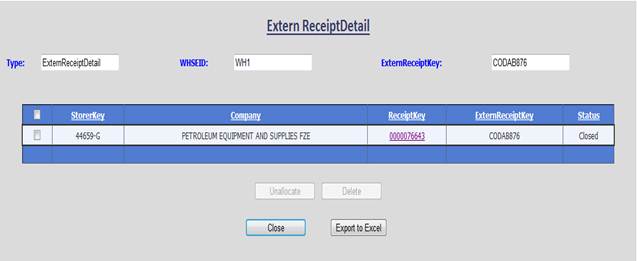
On clicking the
ASN List button the user is taken to the External Receipt Detail page which
displays detailed information about a given ASN as shown in the below image:
Part 2: Searching SKU/Stock
·
The second part
is to search SKU/stock as shown in the image below:
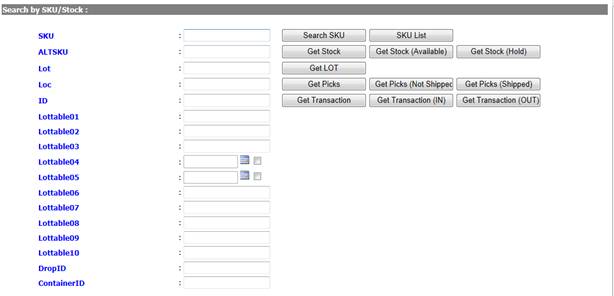
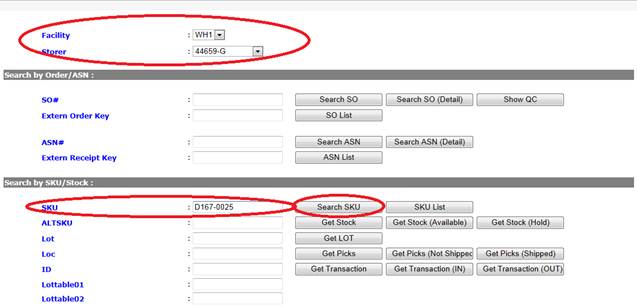
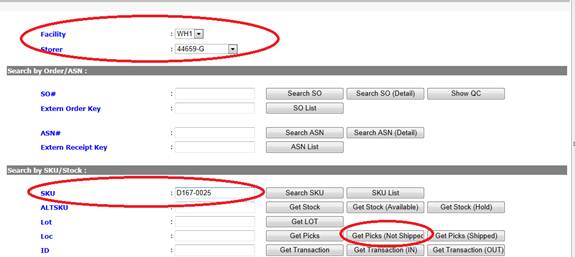
· For searching the details using the sku the facility and storer key should be selected correctly as below:
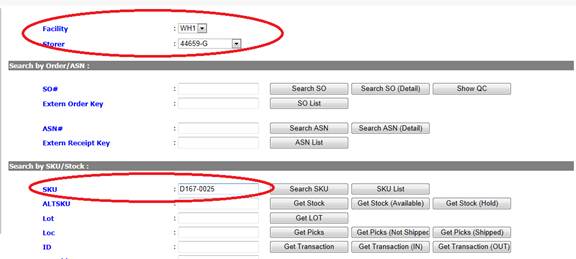
· In the image above we have typed in a Sku for storer 44659-G in the facility WH1. Please note that if the facility and storer is incorrect the details will not be shown.
· If the user wants to obtain more information about the Sku header he can click the Search Sku button after selecting the facility and storer key and entering the correct Sku in the SOKU field as shown in the below image:
·
On clicking the
Search SKU button the user is taken to the SKU page which displays SKU Header
information as shown in the below images:

·
The above images show the SKU page which displays all the
information available with for a given SKU.
·
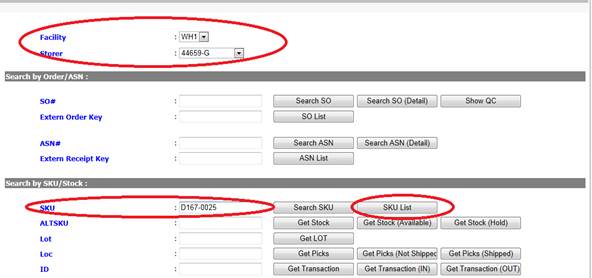
The user can
also get the SKU List by typing in the
SKU and clicking on the SKU List button
as shown below:
·
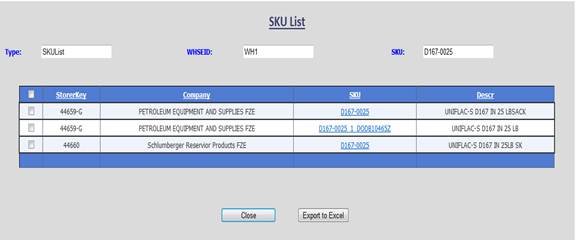
On clicking the
SKU List button the user is taken to the SKU List page which displays detailed
information about the given SKU as shown in the below image:
·
The user can
also get the Stock by typing in the SKU
and clicking on the Get Stock button as shown below:
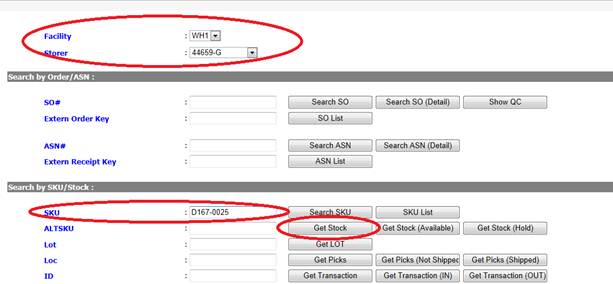
·
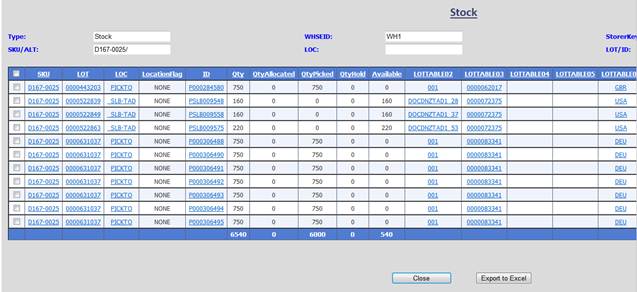
On clicking the
Get Stock button the user is taken to
Stock page which displays detailed information about the total Stock of the
given SKU as shown in the below image:
·
The user can
also get the Stock (Available) by typing
in the SKU and clicking on the Get
Stock(Available) button as shown below:

·
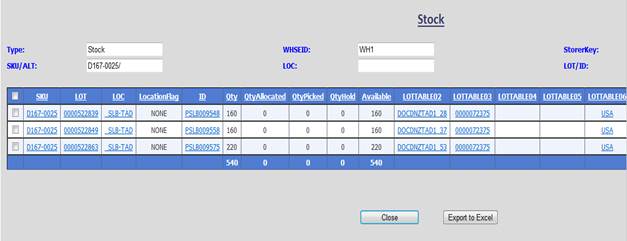
On clicking the
Get Stock (Available) button the user is
taken to Stock (Stock Available) page which displays detailed information about
the available Stock of the given SKU as
shown in the below image:
·
The user can
also get the Stock (Hold) by typing in
the SKU and clicking on the Get
Stock(Hold) button as shown below:
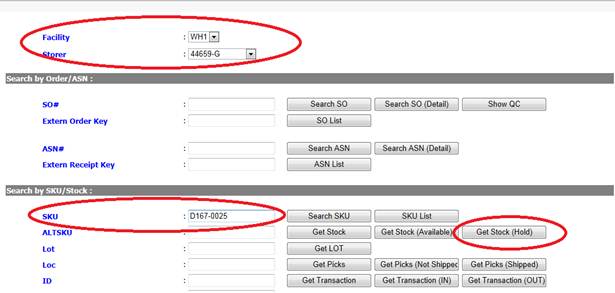
·
On clicking the
Get Stock (Hold) button the user is
taken to Stock (Stock Hold) page which displays detailed information about
the Stock on hold for the given SKU as
shown in the below image:
·
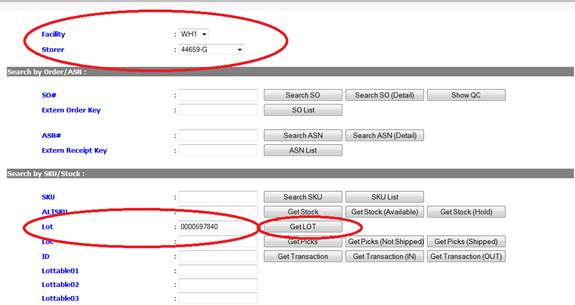
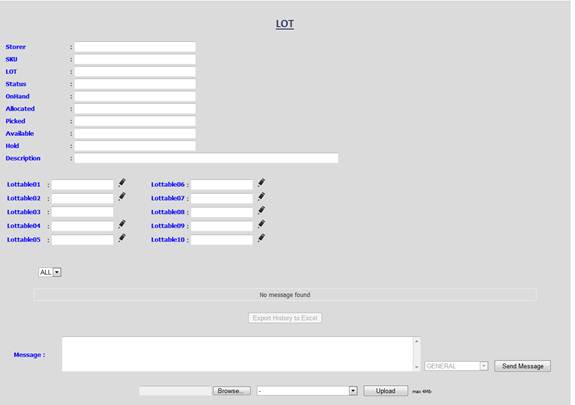
The user can
also get the Lot by typing in the SKU
and clicking on the Get Lot button as
shown below:
·
On clicking the
Get Lot button the user is taken to the Lot page which displays detailed
information about the for the given SKU as shown in the below image:

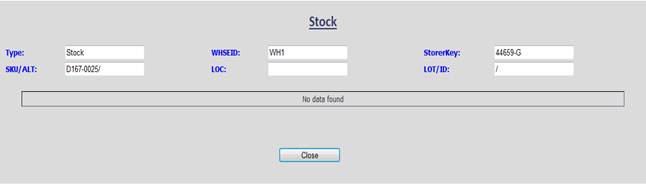
·
As shown in the
above image this SKU does not have any Lot.
·
The user can
also get the Picks by typing in the SKU
and clicking on the Get Picks button as
shown below:
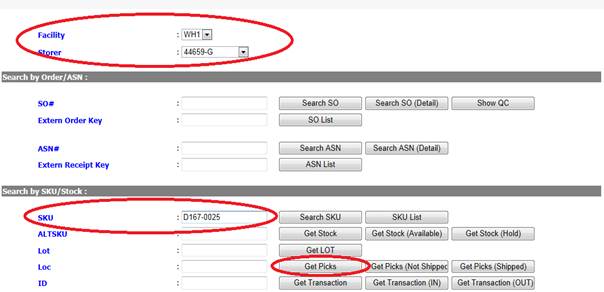
·
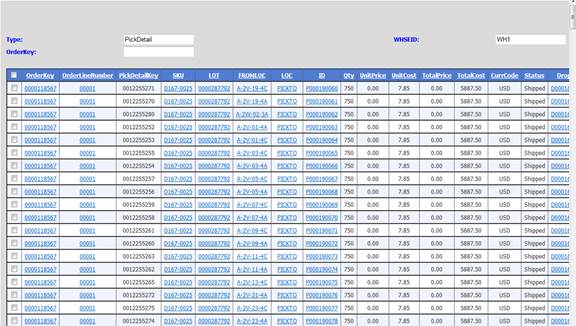
On clicking the
Get Picks button the user is taken to the PickDetail
page which displays detailed information about the picks for the given SKU as
shown in the below image:
·
The user can
also get the Picks (Not Shipped) by typing in the SKU and clicking on the Get Picks (Not Shipped) button as shown
below:
·
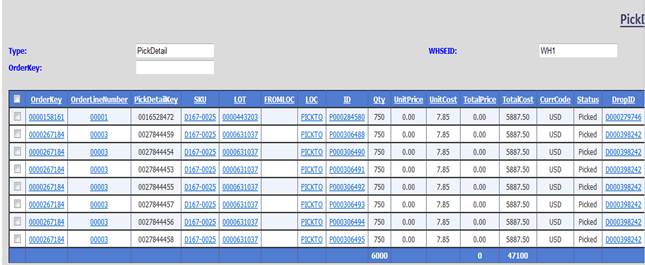
On clicking the
Get Picks (Not Shipped) button the user is taken to PickDetail
(Not Shipped) page which displays detailed information about the picks not
shipped for the given SKU as shown in the below image
·
The user can
also get the Picks (Shipped) by typing in the SKU and clicking on the Get Picks (Shipped) button as shown
below:
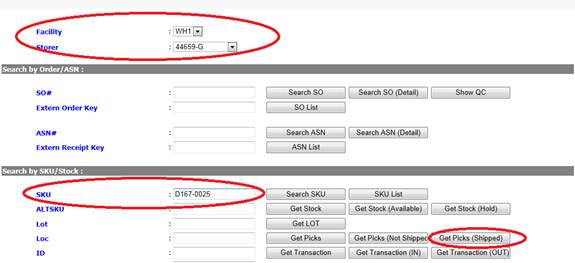
·
On clicking the
Get Picks (Shipped) button the user is taken to PickDetail
(Shipped) page which displays detailed information about the picks shipped for
the given SKU as shown in the below image:
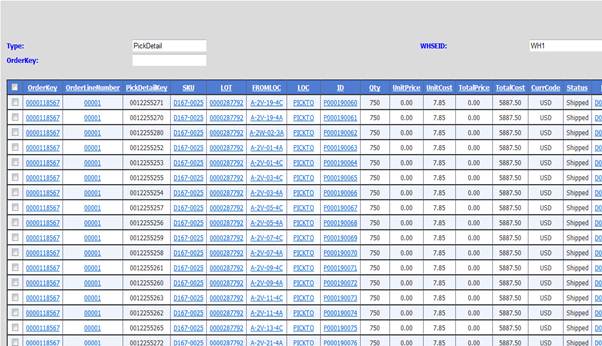
·
The user can
also get the Transaction for the given Sku by typing in the SKU and clicking on
the Get Transaction button as shown below:
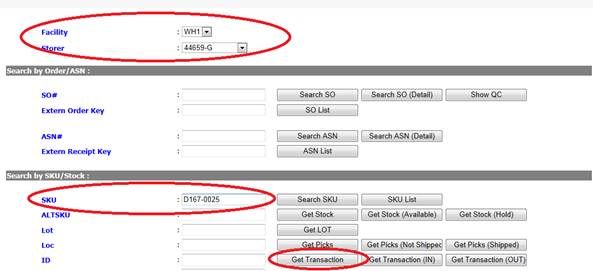
·
On clicking the
Get Transaction button the user is taken to Transaction page which displays
detailed information about the transaction for the given SKU as shown in the
below image:

·
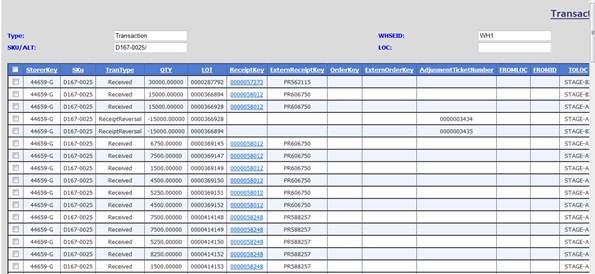
The user can
also get the Inbound Transaction for the given Sku by typing in the SKU and
clicking on the Get Transaction (IN) button as shown below:
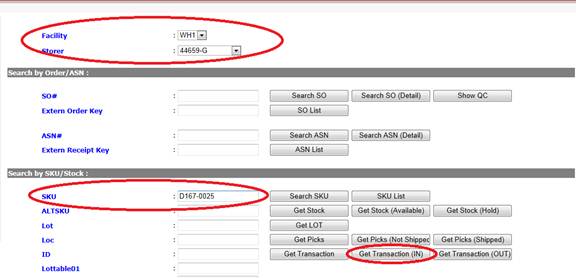
·
On clicking the
Get Transaction (IN) button the user is taken to Transaction (Inbound) page
which displays detailed information about the inbound transaction for the given
SKU as shown in the below image:
·
The user can
also get the Outbound Transaction for the given Sku by typing in the SKU and
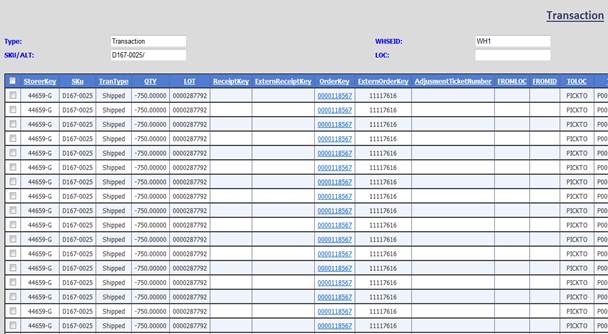
clicking on the Get Transaction (OUT) button as shown below:
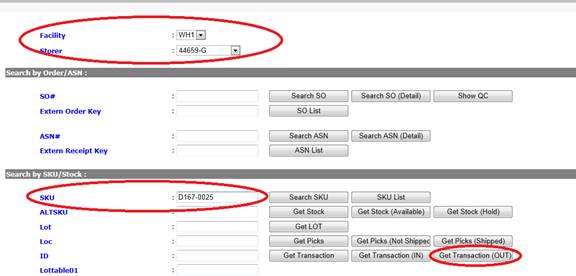
·
On clicking the
Get Transaction (OUT) button the user is taken to Transaction (Outbound) page
which displays detailed information about the outbound transaction for the
given SKU as shown in the below image:
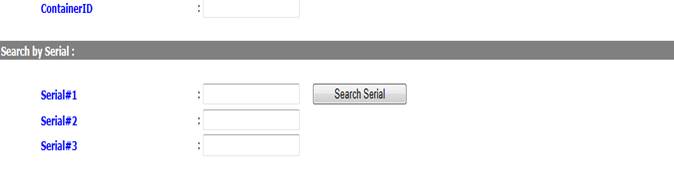
Part 3: Searching by serial
·
The second part
is to search SKU/stock as shown in the image below:
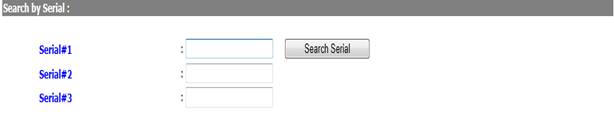
· For searching the details using the serial the facility and storer key should be selected correctly as below:

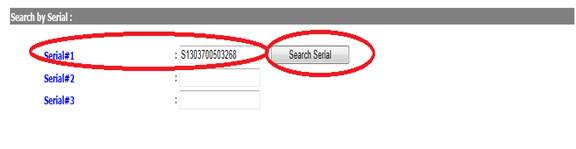
·
The serial
should be also provided correctly as below:

·
The user can
also get the details using the serial key by typing in the serial key and
clicking on the search serial button as shown below:
·
On clicking the
Get Serial button the user is taken to Serial page which displays the information
using the serial as the reference as shown in the below image:
10)
Load
·
The above image
shows the location of the inquiry page on the dashboard panel.
·
The load page is
user to access the information regarding the load details of an SO or SO’s or an console of SO’s.
·
The load page
can have any number of SO’s or Console’s depending on the various factors like
the total weight, size of the container,etc
·
One load can
have both SO’s and Consoles’ at the same time.
·
The below image
shows the load page.
·
The load page
as shown in the above image is mainly divided into parts: (1) The top part with
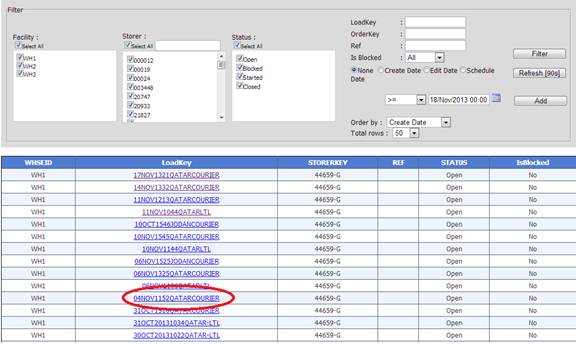
the filters for searching and (2) The bottom part with the load details.
·
The above image shows the search criteria available for
searching the load details like:
a) Facility=WH1,WH2,WH3
b) Storer= Any or all of the storers in our facilities
c) Status=Open, Blocked, Started, Closed
d) Loadkey=Load Key
e) OrderKey= OrderKey
f) Ref=Ref
g) Is Blocked: All, Blocked, Allowed
h) Date=None, Create Date, Edit Date,
Schedule Date
i) Date Operator = >= (Default), <=,=
j) Order By= Edit Date, Create Date
(This is the default order by option) and the calendar icon to select the date.
k) Total Rows: The user also has the
option to view the result in rows of 50,100,500.
·
The below image shows the bottom part of the load page
which contains the load details.
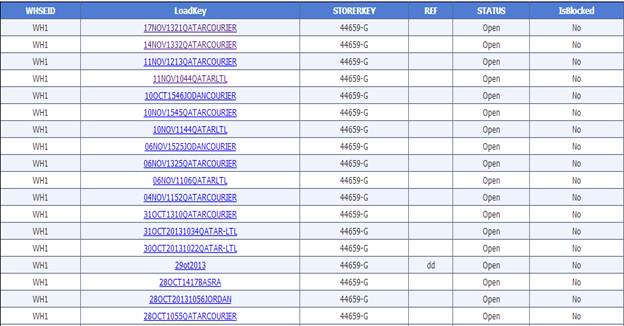
·
Note: The load key
is always created by the CMT.
·
The user can get more information about a load just by
clicking on the load key as shown in the below image :
·
After clicking the load key the user is taken to a new
page containing more information about the particular load as shown in the images below:

·
There is also a pencil icon besides a number of the
fields as highlighted in the images which allows the user to edit the
information.
·
Eg: As in the above image the user can click on
the pencil icon next to is blocked filed and change the is blocked field value
to yes or vice-versa
·
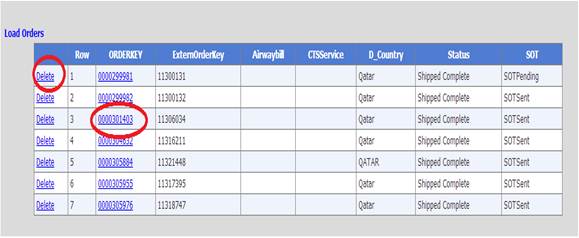
There are also buttons on the load page to add orderkey ie. Order, batch orders,
console as well as to add a DO to the load as shown in the image below.

·
As in the above image the DO option is only available to
some loads and not all.
·
The user can also delete an order from a load by clicking
on delete. The user can also view details about a particular order in the load
by clicking on the order key shown in the image below
·
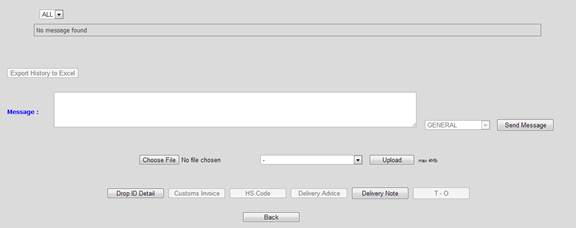
There is also an feature for to user to write a message,
upload files relating to the load in the
documents workflow part of the page as in the image below:
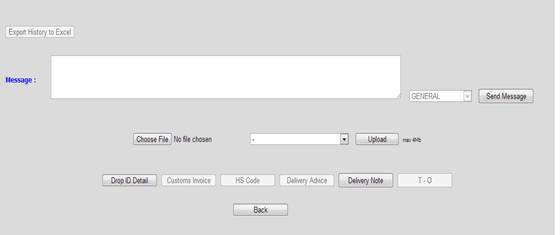
·
The user can also print a number of documents relating to
the load from the respective button on the bottom part of the page like the DropID Detail, Delivery Note, etc.
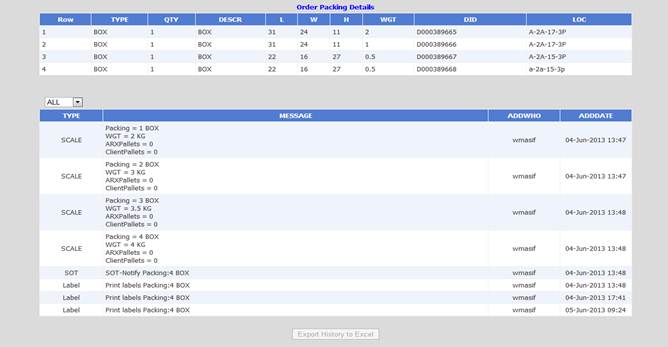
·
The history of the load can also be exported to excel by
clicking on the Export History to Excel button when it is active after there is
a history of the load available.
11)
Vehicles
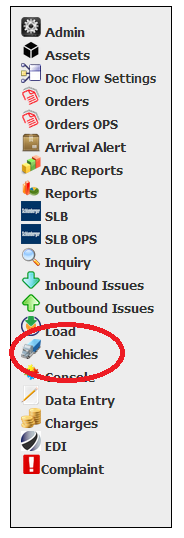
·
The above image
shows the location of the vehicles page on the dashboard panel.
·
The vehicles page shows information regarding the
vehicles arriving in the warehouse.
·
The below image
shows the vehicles page.
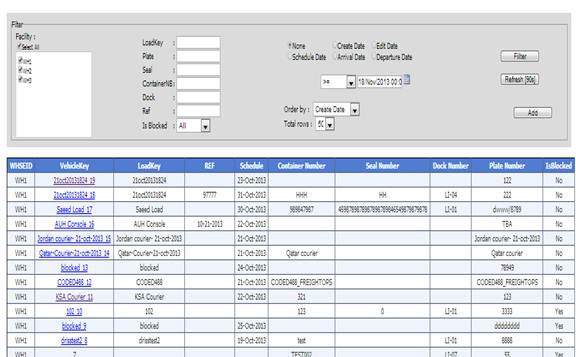
·
The load page
as shown in the above image is mainly divided into parts: (1) The top part with
the filters for searching and (2) The bottom part with the vehicle details.
·
The above image shows the search criteria available for
searching the vehicle details like:
·
Facility=WH1,WH2,WH3
·
Loadkey=Load Key
·
Plate= Plate No of the vehicle
·
Seal: Seal No
·
ContaninerNB: Container Number
·
Ref=Ref
·
Is Blocked: All, Blocked, Allowed
·
Date=None, Create Date, Edit Date, Schedule Date, Arrival
Date, Departure Date.
·
Date Operator = >=
(Default), <=,=
·
Order By= Edit Date, Create Date (This is the default
order by option) and the calendar icon to select the date.
·
Total Rows: The user also has the option to view the
result in rows of 50,100,500.
·
The below image shows the bottom part of the load page
which contains the load details.
·
Note: The
vehicle key is always created by the OPS.
·
The user can get more information about a vehicle just by
clicking on the vehicle key as shown in the below image :
·
After clicking the load key the user is taken to a new
page containing more information about the particular vehicle as shown in the images below:
·
There is also a pencil icon besides a number of the
fields as highlighted in the images which allows the user to edit the information.
·
Eg: As in the above image the user can click on
the pencil icon next to is blocked filed and change the is blocked field value
to yes or vice-versa
·
There is also an feature for to user to write a message,
upload files relating to the vehicles in
the documents workflow part of the page as in the image below:
·
The history of the vehicle can also be exported to excel
by clicking on the Export History to Excel button when it is active after there
is a history of the vehicle.
12)
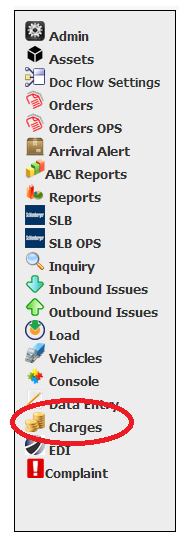
Data Entry
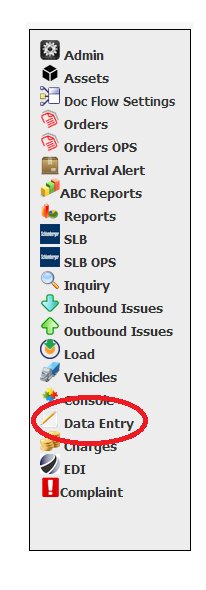
·
The above image
shows the location of the data entry page on the dashboard panel.
·
The data entry page is used to input the total number of
pallets in a specific warehouse at the current date.
·
The below image
shows the data entry page.
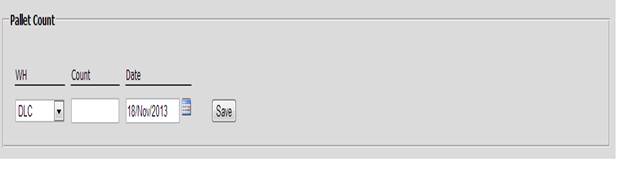
·
The data entry
page as shown in the above image has three
main options namely:
·
WH=DLC,E-HOUSE,INL,KAVEH,TAD
·
Count=This is a text box to enter the total number of
pallets in the selected warehouse
·
Date: This is the option for selecting the date. The user
can select the date by clicking on the calendar icon next to the date
·
Example:
Image No 1
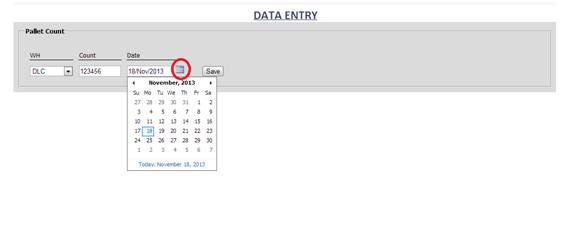
Image No 2
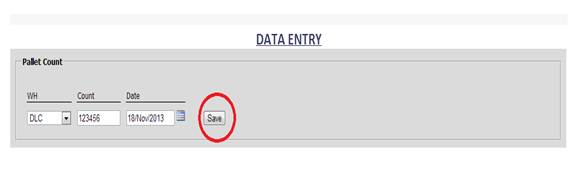
· Eg: As in the above images for an example
· In image No 1: We have selected to input Count as 123456 for WH:DLC and by clicking on the calendar icon as highlighted we can select the date.
· In image No 2 : After inputting the count and selecting the date we can click on save as highlighted in image no 2 to save the pallet count for the selected warehouse for the selected date.
13)
Charges
·
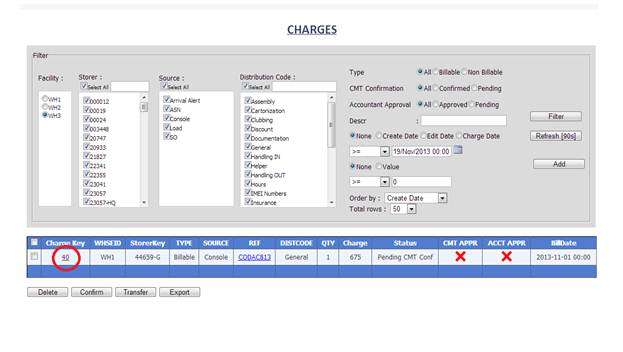
The above image
shows the location of the charges page on the dashboard panel.
·
The charges page shows information regarding the charges applied
to the clients for the various logistics services given to them.
·
The below image
shows the charges page.
·
The charges
page as shown in the above image is mainly divided into parts: (1) The top part
with the filters for searching and (2) The bottom part with the charge details.
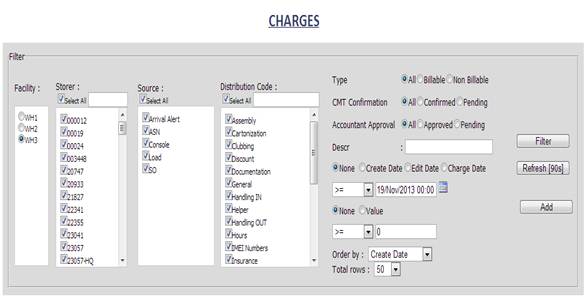
·
The above image shows the search criteria available for
searching the charge details like:
a) Facility=WH1,WH2,WH3
b) Storer= Any or all of the storers in our facilities
c) Source=Arrival Alert,ASN,Console,Load,SO
d) Distribution Code=Assembly,Cartonization,Dsicount,Genneral and many more
e) Type= All, Billable, Non-billable
f) CMT Confirmation=All, Confirmed,
Pending
g) Accountant Approval=All,
Confirmed, Pending,
h) Descr: The text box for inputting the
description of the charge.
i) Date=None, Create Date, Edit Date,
Schedule Date
j) Date Operator = >= (Default), <=,=
k) Date: None, Create Date, Edit
Date, Charge Date
l) None, Value=TO search by value of
the billing
m) Operator: >= (Default), <=,=
n) Order By= Edit Date, Create Date
(This is the default order by option) and the calendar icon to select the date.
o) Total Rows: The user also has the
option to view the result in rows of 50,100,500.
·
Note: The
charge key can be created by both CMT
and OPS
·
The below image shows the bottom part of the charge page
which contains the charge details.
·
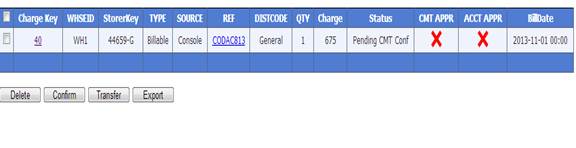
The bottom part
of the charge page as shown above contains the charge key, the WHSE ID, storer key, source, ref, distcode,
qty and the charge itself. It also contains one cross
mark and one tick mark to denote whether its has been approved by CMT and or ACCT.
·
The cross mark
denotes not approved and the tick mark denotes approved
·
The user can get more information about a charge just by
clicking on the charge key as shown in the below image :
·
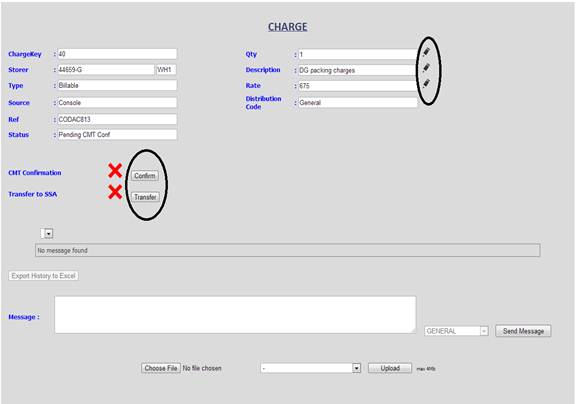
After clicking the charge key the user is taken to a new
page containing more information about the particular charge as shown in the image below:
·
There is also a pencil icon besides a number of the
fields as highlighted in the images which allows the user to edit the
information.
· Eg: As in the above image the user can click on the pencil icon next to qty field and change the qty field value to any number. The same can be done for the description where the user can change the description and the rate can also be changed in the same way.
· There are two buttons as well for the confirmation from the user as well as to transfer to SSA.
· In case of accounts the ACCT Confirmation will be shown instead of CMT Confirmation in the above image.
·
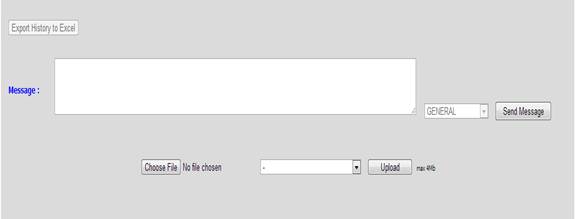
There is also an feature for the user to write a message,
upload files relating to the charge in
the documents workflow part of the page as in the image below:
·
The history of the load can also be exported to excel by
clicking on the Export History to Excel button when it is active after there is
a history of the charge available.